🔥 Ignite Your Fireplace's Potential with Ease! 🔧
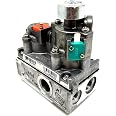
The Hearth & Home Technologies Replacement Variable Valve is an OEM part designed to control the flow of natural gas to your fireplace, ensuring safe and efficient operation. With easy installation and a compact design, this valve meets ANSI B16.11 specifications and is perfect for natural gas applications.
| Inlet Connection Size | 3.5 Inches |
| Outlet Connection Size | 3.5 Inches |
| Item Dimensions | 3.4 x 5.5 x 6.7 inches |
| Specification Met | ANSI B16.11 |
| Valve Type | Natural Gas |
| Number of Ports | 2 |
| Inlet Connection Type | 3.5'' Water Column Natural Gas |
| Outlet Connection Type | FNPT |
J**E
Replaced on Heat n Glo SL-750TR-IPI-E and it works!
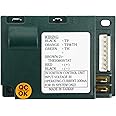
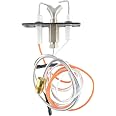
1. Preface: I knew nothing about fireplaces, and I still know very little, but the internet is awesome. Replacing the valve was the solution to my issue. Personally, I think the average reasonable handy-man/woman can do this, but working with gas is a big deal, so it's best to consult a certified technician (which I am not). The following is informational only. It's purpose is to show you what I did to fix my fireplace. I am not a professional, and I am not responsible for any actions taken by others.2. Backstory: I was having an issue with my Heat n Glo fireplace. The pilot flame was coming on, and it stayed on, but the my flame was not there. I found a troubleshooting guide for technicians online, and it described the issue I was having. The two problems it mentions are 1. Faulty Module, and 2. Faulty Valve. I tried replacing the Faulty Module first because it is cheaper and much easier to replace. It only required disconnecting power, unplugging 3-4 wires from the old module (green box), plugging them into the new module, and reconnecting power. The module was not the problem, so I tried this valve, and it worked!3. Tools needed: ratchet set (smaller sizes, I think 3/16, or 1/4?), wrenchs (at least two of the same size, either 5/8 or 11/16?), gas-grade sealant (yellow tube of liquid sealant to apply on threads, $4)4. Process: Replacing the valve (NOTE: this required some labor and safety precautions.)A. First thing I did was shut off the gas (moved the red knob on the silver gas line/hose that goes into this valve so that it was perpendicular to the hose). I also closed off the gas knob that was on my wall outside of the fireplace.B. Next, I unplugged the power source (three prong plug going into a 110/120V outlet) and removed the orange and green wires from the valve.C. Next, I removed the old valve. This was the hardest part, because I had to get the valve off of the bracket and disconnect the two gas lines (one going from the wall into the valve, and the other going out of the valve and up to where the flames should be). I needed two wrenches when unscrewing each side (size 5/8 or 11/16). I used both wrenches to turn the bolts opposite directions. This was tough because there was some gas-grade sealant on the threads. It was also tough because there was not a lot of room to work with. There was also a screw on the top of the valve holding the valve to a bracket. I used a ratchet (size 3/16 or 1/4). This was difficult to get off because of little room to work with, but I managed. There was also another line/ground wire to unscrew next to the gas line going out of the valve.D. Next, I put gas-grade sealant on threads of new gas valve (both sides)E. Next, I screwed, by hand, the two gas lines (in and out) onto the new gas valve, tightened with the two wrenches. I screwed on the additional unknown line/ground wire. I slid the valve into the bracket (required some force), and used the screw to attach to the bracket (using the small ratchet).F. Last, I connected the orange and green wires to the new valve, plugged in the power source, open the gas line by turning the red knob parallel with the line, turned on the fireplace (waited a minute for gas to flow through) and voila! My fireplace works
L**T
Great Replacement
Perfect fit.Great operation
R**W
Direct Replacement
This was a direct replacement for my gas fireplace. Being identical, made replacement much simpler.
D**N
The right part
Top quality part and the exact replacement parts.
S**R
Easily the most valuable purchase this year
Backstory: We bought a house with a Heatilator fireplace installed in late 2015. For unknown reasons, fireplace does not turn on. Natural gas valve is in on position, but there is no smell or indication of gas flowing to the fireplace. Fireplace however sparks when the wall switch turned on, for a minute or two. Main supply valve in the attic is verified and it shows the gas should be flowing to the fireplace.Model Number: Heatilator ndv4236iPilot type: inferllifire (electronic)Additional assessment: I also replaced the control module of the fireplace and there is no change in the issue. At this time, I almost decided to reach out to the dealer, which might have costed heavy, because it is a multiple visit repair. First they need to assess the problem, and then replace the part (which is gas valve) and labor charges. We were looking at around $600-$800 range at this point.Hope of DIY: although I had almost given up on fixing it myself, I came across the recall page on Heatilator that mentions the recall of gas valve on fireplaces installed around 2014. Although mine was late 2015, I read further articles which gave me the hope of diy fix. I ordered this specific model from Amazon which arrived the next day. To my surprise, everything on this gas valve matches to the one I replaced, including the sticker placements.Replacement:Tools needed: two 19mm spanner wrenches - 19mm is minimum, you might be okay with 20mm or 21mm as well (bought from HD for $7 each), yellow thread sealant by Rectorseal (Amazon $4) and a 10mm wrench.1. I removed the log assembly plate by removing 4 screws with 6.5mm sockets. This gives extra room while replacing and also this is a mandatory procedure as we will have to remove 2 additional screws later. Turned off the gas under the fireplace and also in the attic. Disconnect power adapter under the fireplace and release the 2 wires attached to the gas valve (green and orange wires).2. The gas-in and gas-out valves have two 19mm nuts on each side. Hold a wrench closer to the valve and losen the nut on the outside and release the connected pipes on both sides. Just below the gas-out valve, there is narrow pilot pipe connector with 10mm nut. You'll have to pull out the valve assembly to release this (you can do this after step 3).3. Valve assembly is secured with a metal plate attached to the fireplace. You can release this metal plate by removing 2 screws on the top using 6.5mm socket. Once you take out the assembly, make sure you don't pull out the black wire connected to the metal plate.4. Remove the nuts on each side the valve. These are tight and once you move the nut, these come out easily. Wipe the thread, apply yellow sealant and secure tightly on the new valve assembly.5. Secure the gas-in and gas-out pipes like before and connect the pilot light pipe. Secure all the screws and gas log plate in place. Now when you turn on the gas, fireplace should work properly. It took around 30 seconds before the FP started working again.
M**S
Appears identical to the one it replaced which had the model number GFVE14.
Straightforward replacement although access was very difficult (lying on one's stomach, reaching into a narrow, crowded space, no room to wriggle the wrenches more than a fraction of a turn at a time). The pilot light was working fine, but the main burner of the fireplace was not igniting. Replacing this valve cured the problem.
J**Z
Valve Replacement
Replacement for a defective gas valve. Simple install, all connections color coded.
J**.
bad things happen to good people.
looked good. wish i could have tried it. went up in flash fire that destroyed my truck. melted valve into a puddle of aluminum. sadly.
Trustpilot
1 month ago
4 days ago