🌊 Dive into Innovation with ZRDRAquarium!
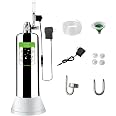
The ZRDRAquarium CO2 System is a state-of-the-art 2L generator designed for aquarium enthusiasts. Featuring an automatic pressure relief valve for safety, a user-friendly bubble counter with a syringe for easy water injection, and a dual atomizer for refined bubble output, this system ensures optimal plant growth while being cost-effective and durable. Made from high-quality 304 stainless steel, it promises longevity and stability, making it a must-have for any serious aquarist.


| Item Weight | 10.58 Ounces |
| Liquid Volume | 2 Liters |
3**O
Using this to make SODA
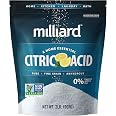
The media could not be loaded. ZRDR Aquarium Co2 System 2L with Pressure Gauge Automatic Pressure Relief Valve Bubble CounterPurchased 20 May 2024 from ZRDR for $77.99WARNING: SERIOUS INJURY OR DEATH CAN OCCUR, DON'T DO THISThis is a nonstandard use of the ZRDR CO2 system. This is more of a product suggestion than a review. For the price, this kit is outstanding for the original intended purpose (aquarium) IMHO. This modification is not for the risk adverse, feint of heart, uneducated, nor unskilled. I am merely illuminating what I have done in the hopes that ZRDR will make a professional system for the masses (product suggestion).In the beginning...there was the SodaStream Art by Pepsico. Then I converted this thing to replace the Art and gave the Art away.I just didn't want to fool around with their reasonable $15 60L CO2 canister exchange program, preferring to make my own CO2 from reactants (baking soda and citric acid). I mean come on, making CO2 is cheap and easy. Upfront investment cost is about the same. Recurring costs can be less, providing local access to low cost reactants. At 200g per charge, 5lbs is 2268 grams yielding 11 charges. For convenience, the reactants are sold right here on Amazon:https://www.amazon.com/gp/product/B000OZFECU/ref=ppx_yo_dt_b_search_asin_title?ie=UTF8&th=1https://www.amazon.com/gp/product/B0774M73SF/ref=ppx_yo_dt_b_search_asin_title?ie=UTF8&psc=1This project does require know how and mechanikin' skillz. There are two basic options, modify this canisters OEM top cap permanently destroying the built in regulator and removing everything past and including the bubbler (port in cap for bubbler is 1/8" BSPP), or drill and tap an M30x1.5mm plug using a ~34x28mm O-ring:https://www.amazon.com/gp/product/B0BCFB7PBV/ref=ppx_yo_dt_b_search_asin_title?ie=UTF8&th=1Then it's basic plumbing parts until the bottle. I clear Epoxy all plumbing joints. I used two ball valves and a pressure gauge so I could check the canister and bottle pressure, all 1/4" NPT. Then a pressure washer quick disconnect:https://www.amazon.com/gp/product/B07RHK7HK2/ref=ppx_yo_dt_b_search_asin_title?ie=UTF8&th=1https://www.amazon.com/gp/product/B08F2X5L24/ref=ppx_yo_dt_b_search_asin_title?ie=UTF8&th=1Then drilled a replacement SodaStream bottle cap with 3/8" brad point drill bit then 13/32" and thread with 1/4" NPT tap, appropriate washer threaded 1/4" NPT, epoxy and a 1/4" compression fitting:https://www.amazon.com/gp/product/B0CZ32LWCC/ref=ppx_yo_dt_b_search_asin_title?ie=UTF8&th=1And a check valve between pressure washer QD and 1/4 compression fitting:https://www.amazon.com/gp/product/B0BN6HL5B3/ref=ppx_yo_dt_b_search_asin_title?ie=UTF8&psc=1Then there are two options for the 1/4" stainless tube. From the underside of the bottle cap to the end of tube assembly should be 3+1/2 to 3+5/8 inches long. Easiest was to use a piece of this tube and crimp end in vise for small holes ~1mm:https://www.amazon.com/gp/product/B0006NAUQK/ref=ppx_yo_dt_b_search_asin_title?ie=UTF8&th=1Fill Sodastream bottle with water to line, chill in fridgedator, screw on and three *quick bursts. NOTE: releasing Sodastream bottle pressure between each burst (I just unscrew bottle from cap). At the end of each burst the bottle pressure should read ~55psi. I should have added a 55psi regulator. This is INHERENTLY DANGEROUS as the Sodastream bottle can be pressurized to way more than 55psi.The second method for the tube assembly that I preferred was to use heavy wall (0.065" wall) stainless 1/4" tube, drill and tap for 3/16-24, then use a vented socket head stainless screw (0.046" hole = 1.1684mm). Both purchased elsewhere.Sodastream bottles and caps here:https://www.amazon.com/gp/product/B01AHGDQ3Y/ref=ppx_yo_dt_b_search_asin_title?ie=UTF8&psc=1https://www.amazon.com/gp/product/B004OYMOK2/ref=ppx_yo_dt_b_search_asin_title?ie=UTF8&th=1Amount of CO2 in soda is amazing. I get 6 to 10 1L carbonized Sodastream bottles out of a single baking soda and citric acid charge. At 11 charges that is at least 60 1L bottles carbonized, up to 110. When ZRDR canister pressure drops to below 100psi, I pressurize the Sodastream bottle assembly, then QD and shake vigorously for 10-45 seconds, let sit in fridge for a bit to get more 1L carbonized bottles out of a single charge. This is the reason for the QD and check valve on bottle cap assembly. I like this method for many reasons, the added bonus is it doesn't leak so CO2 waste is minimized. But it lacks a safety release and regulator making it INHERENTLY DANGEROUS.Some notes: I did some research and lots of R&D on this project. What I show here is what I ended up with that IMHO works best. DO NOT use more than 200g of baking soda, 200g of citric acid, and 300g of water in this canister. Pressure will build to 270psi (room temperature) after a couple days unless you use some of the CO2. The canister safety release built into the OEM top cap is advertised for 30Kg/cm2 which is 426psi. My method shown here eliminates that safety release which is DANGEROUS and NOT recommended. I should have added a 300psi 1/4" NPT safety release sold right here on Amazon. Ordinary soda bottles have a burst pressure of 12bar which is 174psi, though there is yielding way before burst, I do not use ordinary bottles. Sodastream bottles are heavy wall and burst has been tested (one unit) at 25bar or 362psi, though there is yielding way before ultimate. Pepsico says this: "To successfully carbonate water with a CO2 tank, the gas regulator valve should be set at 55 PSI, to enable the serving pressure to remain at around 12 PSI." I should add a 55psi regulator, this method is dangerous as the Sodastream bottle could be pressurized way above 55psi. Pepsico advertises 4 years per Sodastream 1L bottle, not cycle dependent. The modification I made to the Sodastream bottle cap invalidates all of this. It would be best if a cap was specially made for this application (product suggestion).edit 23 July 2024I ended up replacing the vented screw with a 0.8mm misting nozzle. Taking the misting nozzle apart and removing the spring and rubber check valve. This works much better. FYI 0.6mm is too small.https://www.amazon.com/gp/product/B093L385FF/ref=ppx_yo_dt_b_search_asin_title?ie=UTF8&th=1Also, I purchased a used 5.5L tank elsewhere and added an oxygen regulator, but that bottle needed a smaller o-ring stretched on the M30x1.5mm top cap, 1"ID by 1/8" thick.https://www.amazon.com/gp/product/B073P1C18S/ref=ppx_yo_dt_b_search_asin_title?ie=UTF8&psc=1Notes: Helps to put glycerin on the o-rings. Helps to put a small 5" balloon in the tank and fill with water (ye old brass hose nozzle) then drop in tank and screw on top cap. Then shake. Balloon comes later for reuse.https://www.amazon.com/gp/product/B07SR1P15T/ref=ppx_yo_dt_b_search_asin_title?ie=UTF8&th=1
B**N
Great option instead of going to the gas company for co2
It’s very sturdy and works perfectly. I’ve seen the old method using the plastic soda bottles and didn’t want to attempt making my own co2. But, with this I’m perfectly fine making my own. It’s great except the screw top is a little troublesome at times to screw back on but, not a deal breaker and I think they updated this model with an easier screw top. If you’re new to making your own co2 like I am I would suggest you buy this.
T**G
Best Co2 tank for planted aquarium
The media could not be loaded. After hours of research on Co2 tank kit, I finally found a “nearly perfect” Co2 tank kit which is the magtool that fit my budget. But this one is even a better price! Like bruh! Dont go for those brand one that charge you like an arm and a leg. Trust me, you need Co2 if you plan to start a planted aquarium. This is my Co2 tank kit first one is magtool and second one is this one. No leak whatsoever.I’ve always failed to start a planted aquarium without using Co2 and just focusing on aquarium plant. Hella algae and I gave up. This is the first time and I said F it and just get myself a Co2 tank with citric acid and baking soda as a reactant to get Co2. It sounds easy to go to a store and refill your Co2 tank but I’m too lazy and I live in the Bay Area, and I yelped and found that they charged like $15 to fill up a 4L Co2 tank. So I just use the baking soda and cictric method for a cheaper price and dont have to go anywhere. Baking soda from Arm and Hammer get you like 13.5lb for $12 at Costco. Citric acid is like 6lb for $23 with Milliard. Every reaction, you only need to spend like $5.2 per 4L for Co2 bottle with 450 - 550 PSI.People are really bad with math on here like bruhh, use freaking chatgpt if you are bad at math and chem. To sum it up, to create Co2, for every mole of citric acid you need 3 mole of baking soda. So you need 457g of citric acid and 600g of baking soda with 934mL of water to produce approximately 641psi of Co2. This is based on perfect calculation, usually you will get around 450 - 550 psi of Co2.1:1.3129 (citric acid, baking soda)Water required to dissolve citric acid:For 457 g of citric acid:457g/148g/100 mL=3.09× 100 mL=309mL of waterWater required to dissolve sodium bicarbonate:For 600 g of sodium bicarbonate:600g/96g/100 mL=6.25× 100 mL=625 mL of waterThis is the reason why you need 934 mL of water to dissolve everything correctly. Just plug in different gram of baking soda (sodium bicarbonate) and citric acid to get your required water.Since citric acid is more expensive than baking soda that you can get in Costco, I set the citric acid as a limiting reagent.TLDR; remember 1gram:1.3129gram (citric acid, baking soda) then calculate the required water to dissolve everything!Now you just need to add those baking soda, citric in and shake that stainless steel and add water at an angle. Easy peacy no cap. The diffuser for this suck, similar to the magzone one, so buy a different diffuser from fzone or something. My first time starting the magzone one and I stare at the freking thing for like 3 hours with no Co2. Keep thinking there is a leak or something but it’s the bad diffuser and searched all on reddit….. get yourself a different diffuser. Now I know to get an extra diffuser for this brand too, cause this diffuser kinda bad and make noise like the hell? Also get yourself an alexa outlet or something outlet with a timer that you can control with your phone for your solenoid. Since I use this Co2 tank with a Siesta Method. No algae whatsoever!!! First time I got no freaking algae with this algae and maximum brightness. I got 4 tank and I used hygger and Brite light. Brite light is the best trust me. Easy to set up and can set up when it is turn on in correlation with your Co2 turning on.The Co2 tube is kinda rigid to stick it to the bubble counter. I kinda have to use a lighter and loosen up to tie the nut to the bubble counter.Co2 7-11am on 3-9:00pm onLight 8-12on. 12-4pmoff 4-10 onOne hour before light turn on to build up Co2 for the tank so plant can use right away. 1 hour turn off before light turn up so light can use all excess Co2.First time setting my planted aquarium and it grows beautifully without algae. Im obsessed with growing plants now haha.Look at my red lotus before and after photo. It exploded! Oh I also added easy green fertilizer everyday too and no algae compared to the bad thrive NA and flourish excel that kill my snail and shrimp.The CO2 PSI in the photo that I have is after 2 weeks of 3bps and still around 500 PSI remain. Way better than those refilled Co2 tank. When I first add all the ingredients, it is only go up to 100PSI but the next day it jumped up to 400 PSI and has remained at 500 PSI since.
Trustpilot
1 month ago
5 days ago