


Yosoo 8x8x8 3D LED DIY Cube Light Kit Squared White LED Blue Ray
Product ID: 25198697
Details
- Finish TypePolished
- Base MaterialCeramic
- Bulb BaseE12
- Lamp TypeDesk Lamp
- Shade ColorWhite
⚡4.5-5.5V Power
💡512 Bright LEDs
🔌USB Connectivity
✨ Light Up Your Imagination with the Yosoo Cube!
The Yosoo 3D LED DIY Cube Light Kit features a compact design with 512 super bright LEDs, powered by a USB connection and designed for easy customization. Perfect for DIY enthusiasts, this cube offers touch control and a sleek industrial style, making it an ideal decorative piece for any indoor setting.
| Asin | B01C8AS6W8 |
| Base Material | Ceramic |
| Brand Name | Yosoo |
| Bulb Base | E12 |
| Bulb Shape Size | B10 |
| Color | White |
| Connectivity Protocol | Usb |
| Connectivity Technology | USB |
| Control Method | Touch |
| Controller Type | Push Button |
| Customer Reviews | 3.9 3.9 out of 5 stars (35) 3.9 out of 5 stars |
| Efficiency | high |
| Finish Types | Polished |
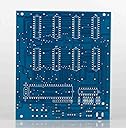
| Included Components | circuit board led round socket ic socket dip usb to dc005 cable dc005 socket IC socket uln2803 dip stc12 c5 a60s2 a09-103 resisters self locking switch electrolytic capacitor crystal ceramic capacitor resistor led strip 0.8 single conductor cable |
| Indoor Outdoor Usage | Indoor |
| Installation Type | User Assembly" or "DIY |
| Is Product Cordless | No |
| Is Waterproof | false |
| Lamp Type | Desk Lamp |
| Light Source Type | LED |
| Lighting Method | LED |
| Manufacturer | Yosoo |
| Material Type | Ceramic |
| Model Number | XDOT0500 |
| Mounting Type | Tabletop |
| Number Of Items | 1 |
| Number Of Light Sources | 512 |
| Number Of Pieces | 512 |
| Power Source | Corded Electric |
| Recommended Uses For Product | Decoration |
| Room Type | Usb |
| Shade Color | White |
| Shade Height | 9.3 Centimeters |
| Shade Material | Ceramic |
| Shape | Square |
| Style Name | Round |
| Switch Type | Push Button |
| Unit Count | 1 Count |
| Upc | 600346232150 |
| Water Resistance Level | Not Water Resistant |
| Wattage | 4500 watts |
User
A Fun and Challenging Kit
All in all, quite a challenging kit. It took the better part of five evenings to complete this kit. The instructions are absolutely ridiculous, and offer only a vague guide on how to assemble the LED matrices. My largest complaint with the "instructions" is that they seem to suggest soldering the IC sockets and components first- I would definitely recommend soldering the pin sockets for the LED matrix first, as several of them need to be soldered under the IC sockets, and this would probably prove to be an incredibly frustrating experience if the sockets were already mounted. Do take care to mount the pin sockets square to the PCB, it will definitely assist later with final assembly.My kit came with several spare parts, which is far preferable to having it show up with missing pieces. All the parts seem to be of reasonable quality, although there was an LED with extremely thin, foil like leads that was unusable, and one LED with markedly reduced light output. Two bad LEDs out of the 550 provided really isn't too bad. Just be sure to test as you build, I imagine that trying to correct a problem after final assembly would be a messy affair.This thing certainly does attract attention and I have already had several requests to build them for my friends and clients. For my own part, I'm ready to have a go at an RGB cube!(P.S. The flicker in the video is an artifact created by the shutter of the camera. The actual unit does not flicker in use.)
User
Difficult build but worth the effort
Disclaimer: I'm an electrical engineer with professional soldering equipment and experience debugging electrical components. This project is probably not for the beginner.I used online videos and instructables for tips on how to assemble. Like others, I pre-tested all of the LEDs before soldering but didn't find any bad ones. My issue was a bad resistor network that caused some erratic behavior. Perhaps it was my fault because I installed it backwards at first and had to unsolder it and turn it around. Luckily, I just happened to have a 10K resistor network laying around (electrical engineer) and that fixed the problem. The built-in animations are good, but I wanted to be able run my own patterns using an Arduino. A github page by Tomazaz contains instructions and new firmware for the cube that allows pattern control thru the serial pin header. When flashing the new firmware, you should connect Rx->Rx and Tx->Tx since you're in bypass mode (controller in reset). After the firmware is loaded, you can send patterns to the cube using Serial.write commands (Rx->Tx, Tx->Rx) . I started with code from the github page of yanbec/esp8266-wifi-ledcube. This had all of the basic code to send an array of bytes which is ok for simple patterns. In the end, I modified this code to use a 2 dimensional array where the x-axis data is embedded in the array data like CHR did in his instructable. This allowed my do all of the math-based patterns that you see in his video, like rain, ripples, and fireworks. My next step is to add wireless capabilities and create an app with MIT App Inventor so I can control the cube with my phone. I might even try creating a pong-like game.
User
No instructions. Jjust a bag of parts. Search the web for help.
Just a bag of parts. Search the web for help.
User
3D POS 8X8 led cube
The kit came faster than expected the components seem to be of good quality.The kit is complete accept for no instructions. I do like the kit I'll have to add more after it is built.
User
not smart enough to read chinese OR to figure out how to put this together.
disappointed to find out this product requires a phd to put together. am returning it. sorry. looked cool!
User
Satisfying
It was very time consuming to build but satisfying when it is complete. No instructions with it but can follow some of the same builds on YouTube. It does have extra leds and extra parts.
User
... yet but all the parts are there and look good.
Have not built it yet but all the parts are there and look good.
User
NO INSTRUCTIONS.
NO INSTRUCTIONS: After completing the circuit board, I was left with extra pieces that did not have a space and spaces for pieces that I did not have parts. I got the circuitboard to light up, but I could not get any of the LEDs to light.After searching YouTube, for some help, there are many variations of circuit boards, whose parts are not the same as mine. I can’t even find a PDF file online for help WTF.
User
no instructions no code
this product has no instructions or code included. i want to build it but i'm not sure how
User
Exelente
Me agrado el servicio
User
Many problems
Cube not work after first test. I found problems like: missing components, components that not much with the PCB ex CI sochet with 16 pin instead of 18, and other
User
Económico pero apenas cumple con lo prometido
El kit llega en un empaque mínimo. No incluye la caja que se muestra en la publicidad para guardar todos los circuitos integrados y demás accesorios. Sin embargo la calidad no es mala. Estoy en el proceso de armado, y comentaré más adelante si todo funcionó.Update: Todo funciona de acuerdo a lo estipulado. Buena calidad, pero no envían exactamente lo que se muestara.
Trustpilot
2 months ago
5 days ago