🎬 Capture, Edit, Share - Your Video Journey Starts Here!
The easydayDC60 USB 2.0 Video Capture Adapter with ChipSet UTV 007 is a versatile tool designed for seamless video recording and editing. It supports various formats, includes professional editing software, and is compatible with both Windows and Mac operating systems. With a video capture resolution of 720p, it allows users to create high-quality content that can be easily shared across multiple platforms.
Compatible Devices | Television |
Antenna Location | Video Recording |
Hardware Connectivity | USB, USB 1.1, USB 2.0 |
Minimum System Requirements | Minimum system requirements: Windows 7, 8, 10, 11 or Mac OS X, USB 2.0 or USB 1.1 interface. |
Video Capture Resolution | 720p |
AV Output | MPEG-1, MPEG-2 |
Operating System | Mac OS X, Windows All |
Platform | Windows 7, Windows |
Additional Features | Versatile recording format support |
C**D
Works on Win7 for VHS (with some experimentation)
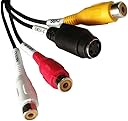
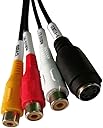
This works well for backing up my VHS collection on Windows 7. Took some trial and error though. Here's how I did it to maybe save you some trouble. 1. Use composite (red/white/yellow) plugs, I haven't tried S-Video. 2. After you plug it all in, go to your windows device manager and look for something that says usbtv or OEM Device somewhere in the list of devices. Once you've found it, you can click on that device and find in its options the place where you can update its driver. Browse for the driver and if you have the mini cd that comes with the device in your cd/dvd/br drive navigate to that location. On the cd there are driver folders marked for a handful of operating systems. Find the right folder for your OS and install the driver. You don't need to install the software that comes with it. 3. Install VirtualDub, you can find this on sourceforge, it is free and not filled with adware. 4. Start up VirtualDub. Once it's started, in the file menu choose "Capture AVI" or similar option. After you do that, VirtualDub will enter capture mode and all the menu items change. Under File (I think) you have to Set the Capture File name and location, so do that. Choose a location on your hard drive with A LOT of free space, you will need approximately 1.5 GIGS (yes, you read correctly) per MINUTE of video. This is assuming you are capturing HUFFYUV lossless video. You can compress the video afterwards, but you should capture lossless if you want the highest quality and aren't very well versed in codecs and compression. 5. Once you have set the file name/location, go to the Video menu and make sure the Video Source is set to COMPOSITE. (I'm doing this from memory, so if you can't find the option, search around in the video menu. 6. Under video also, make sure PREVIEW is selected and not overlay. 7. Under audio, make sure audio capture is enabled but NOT playback. Unless you have a really powerful computer audio playback during recording will cause you to drop a lot of frames, probably causing video jitters or sync issues. 8. Once that is all set, you can find the option to "Capture Video" or "Start Capture" in the Capture menu somewhere. Click play on your VCR and Start Capture and let the entirety of your vhs tape play. You will be able to see it but not hear it. It is capturing the audio, just not playing it back at you. After the tape finishes, press Stop Capture in the Capture Menu and stop your VCR. 9. Download another free program called Handbrake off the internet. Install/open it. 10. Under Source, browse to the avi file you ripped with this device. For the destination file, choose a filename/location on your hard drive with at least 4-5 gigs of space available. Choose "High Profile" from the list of presets in the right window of the program. Click Start! When it finishes (will take up to an hour or two for standard 90+ minute vhs tapes or maybe longer if you have an older computer) inspect the quality of the new (far smaller in file size) file and make sure your video is good. You can delete the massive AVI file if you are happy with the smaller, new file. Enjoy! If you see weird horizontal bands in the video, you need to deinterlace/decomb the video. This is complicated in terms of all the options available but for beginners just repeat step 10 and after you choose High Profile look for a radio (circle) button in the bottom menu marked Decomb. Select that (click it) and make sure the drop down below it says "Default" (click on it and select Default if not). Click start again (you might get prompted to overwrite the video you just made, that's normal, just click the affirmative Yes/okay/proceed whatever option). It will reencode the entire video, so you'll have to wait a couple hours again. Hopefully that removes the horizontal bands.
M**S
Worthless POS
This item is supposedly a video capture device. It is obsolete, comes with confusing incomplete instructions, is accompanied by obsolete defective and unsupported software, and quite simply DOES NOT WORK! It just sits there and looks stupid.I wasted hours of my time trying to find software instructions or support (the software Mfg has disowned this program).I checked the inputs and outputs for the device and verified that another manufacturer's device worked properly when substituted.The VLC media player, a good free program, works with others but not with this.Finally, to make the entire experience perfect, the seller DOES NOT ACCEPT RETURNS! (NOT disclosed up front)I will avoid both this seller and this manufacturer in the future and suggest that others do the same.
J**
Works but I would use different software.
The product itself works. The picture quality depends on the source material. I cannot speak to the quality of the s video but the rca connections work just fine. The included software is a demo that only records up to 10 minutes but you need to install for the driver. Instead I would use something like streamlabs obs which is free and is easy to operate. Even though it's primary purpose is streaming you can use it to record the videos as they play on the screen.
R**.
Works great!
Better than the Elgato Video Capture. SW instructions that came in the box were not for this HW so I took a star off. Installs Honestech TVR 2.5 (CD Key is printed on the disc). I installed the SW first before plugging in any HW. I did not need to install any drivers on Windows 10. I rebooted, hooked up my Video8 device and it worked great. No line or screen tearing like I got on the Elgato.
W**K
Works out of the box with Linux!
This worked like a charm with Ubuntu Linux and OBS. Immediately recognized and perfect picture and audio quality. Absolutely no complaints or regrets with this!
J**H
hard to find the proper driver!
I spent hours searching for the proper driver for this device. it was not included in the software that came with the device! The device will not operate without the proper driver! The seller was no help finding the driver. Finally, by chance, i was able to locate on the WEB, a Co. which downloaded the correct driver. After that, the device worked perfectly. the software program was easy to use.
K**E
Works well on Windows 10
I bought this product to convert some old VHS tapes to digital. I have a Windows10 desktop computer, and I was able to digitize within 10 or 15 minutes of installing. I did not install the drivers that are on the disk, I let Windows install it's own drivers. Overall, it's been a good product for the money.
B**B
Can't get it to work with standard apps.
Doesn't work for me. I've tried this on two different Windows 10 systems. I installed the drivers and the included application. If I run the included app, it shows video from the EasyCap, so I know all the hardware is working. But no other application detects the device (i.e. the built-in Microsoft Camera app, VideoLAN, and Adobe Premiere don't see any camera device on the system). Since I want to use this for live web streaming, the included app is not sufficient.
Trustpilot
1 week ago
3 weeks ago