


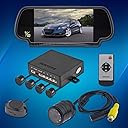
Rearview Backup Camera System (Rear View Mirror with Built-in Display, Color Camera and Sensors) HK-777P
Product ID: 21746427
E**R
Installation instructions
Good product - terrible installation instructions so I had to go it alone. Here's what I found:This is actually 2 separate systems. To install back up mirror:Place mirror on rear view mirror. Lower "feet" are spring loaded, but didn't seem to expand enough to go over a GM OnStar mirror. With some convincing, the lower feet stretch out wide enough. Kit includes 2 tie wraps to fully secure the unit. Mirror comes with one wiring harness. The extension of this harmed was barely long enough to stretch to the trunk of a Saturn Aura, running straight across above the head liner. Be sure to pull the cable through the trunk and into the passenger compartment before pulling through the headliner. Other end of this cable contains a control box, which features 7 wires. These are as follows:Red - 12v powerBlack - groundGreen -,reverse activation wireYellow w/RCA Jack - Video 1 (camera) with 12' RCA extension cableWhite w/RCA Jack - Video Aux mode with 12'RCA extension cableI wired the above wires as follows -Red and black - these need to be wired to a power source that as activated via the ignition switch. Though I ran the mirror cable through the headliner, I ran the power wiring (12' extension cord with end snipped off) through the running boards, under the driver's seat and into the car's console which has a cigarette lighter (I'm dating myself) inside the console. So as not to have to it into the car's power wiring, I purchased a power Jack expansion unit from Advanced Auto that converted 1 Jack to 3. This unit had wiring between the 2 ends, which allowed me to cut into the lighter for power. Be sure to confirm which wire is hot and which is ground. The other end of this makeshift extension wire wirenutted to the red and black, continuing polarity. This setup allows me to disconnect the system of needed simply by extracting the lighter extension from the power Jack (inside the console.Green wire - Again, needs and extension. Removing the tail light assembly, I determined which bulb was the reverse light, cut this wire and added the green wire. Note - black is ground, so it's the other wire.Yellow wire with RCA adapter connects to RCA Jack from back up camera via one of the RCA extension cable.White w/RCA adapter - This is the Aux channel on the screen. So, along with the power cable, I ran the other RCA extension cable into the car's console. This will allow my daughter to plug a video out device from inside the car.NOTE: I Velcroed the three port cigarette lighter jacks to the side of the console box so they were facing forward instead of up, so nothing would accidentally drop into them and short the circuit.Camera install and wire. It's necessary to drill the bumper to install this. I removed the licence plate light assembly which allowed me to feel behind the plastic bumper to insure I didn't drill through any wiring, and allowed access to the camera's lock ring to install. The camera comes with a couple offset rings. These allow one to compensate for any angle on the bumper to get the camera to aim rearward correctly. Note, the camera's image is sensitive to its placement, so you'll need to rotate it to give a correct horizontal image once the system is set up. I drilled this hole (large hole saw provided), and the 4 holes for the reverse warning system all at once (small hole saw). This gave me access across the bumper to fish the units' wiring to below the tail light. When fishing the camera wires, be sure to sleeve them through the locating first! Camera wires are a Yellow RCA Jack (connected to Yellow RCA wire from mirror using the second RCA extension cord, and a black power plug in wire. I taped these connections well before fishing the so the wouldn't com apart inside the bumper. I was able to find a penetration grommet below the tail light and fished these wire through to inside the trump. Power wire has a red and black, which hooks up with the control box red and black, and my extension cord power wire. That's the camera hook up.Rear warning system - this is completely separate from the rear view system.Sleeve sensors through the holes drilled in the bumper, making sure to step them across the bumper using the ABCD labels start at the far sensor, fishing through the holes drilled for the closer sensors until all 4 wires protrude about of the closest hole to the unit. Sleeve these wires through be same grommet into the trunk. ALSO, fish the balance of your 12' extension cord from the license plate illumination light into the trunk as well. The rear warning system includes. Control box with output jacks labeled A,B,C and D. Plug the sensor wires into their respective jacks. Only after this is complete should you install the sensors into he bumper, in case there's a mess up.There is a power Jack with a red and black wire attached. Wire but these wires to your extension cord wire from the license plate light. Be sure to note polarity. There is a Jack on the box labeled buzzer. Before plugging this ire into the control box, sleeve it in from the passenger compartment so you can mount the buzzer inside he car. Plug this wire into the control box. With the kit comes a harness with a yellow and black RCA Jack that plugs into the control box. I have no idea what this is for. NOTE: There is a switch on the buzzer with an OFF, QUIET and LOUD setting. Be sure the buzzer is turned on before setting.NOTE: Icused different power sources for the two system ax and the cigarette lighter that powers the camera is om a "Delayed Off", meaning it continues to get power for a time after the car is turned off. Using this power source for the rear warning system leaves that system on and allows the sensors to beep up a storm if you go from car to trunk (it's sensing your legs). Powering this system using the license plate power deactivated the sensors with a Key Off.Testing - the camera comes with a remote that has a power button. This needs to be on to activate he camera start the car and put it in reverse. In a second or two , the rear camera comes up on the mirror. Adjust the camera for a good horizontal shot. The remote also allows one to toggle between camera and aux input, as well as adjust the camera quality. Be sure to remove the plastic lense cover on the mirror so allow the remote to work properly.The rear softly system should activate whenever the car is ON. Adjust the loudness level on the buzzer to you liking.When testing is complete, tie wrap your wires, reinstall the tail light and license plate light and you're good to go!
J**N
Poor backup camera system.
Poor product the rear view mirror when used as a mirror is lousy. It is like looking into the dark as it is the worst mirror/monitor I have seen. I would not recommend this to anyone. The backup sensors don't give the same signal when backing into the same area. Thought this was a good price turned out to be a bad deal. Seller is selling a poor product not sure if they know it or not.
M**T
Does not come with instructions on how to install. ...
Does not come with instructions on how to install. Called the company twice to as for help and got hung up on both times.
C**O
One Star
Poor quality drill bits. No installation manual.
C**E
One Star
Was not easy to install.
Trustpilot
2 weeks ago
2 weeks ago