

ThreeUp v2 3D Printer Kit 7" x 7" x 8.25" i3 Build Dimensions 50 Micron 1.75mm PLA ABS Nylon
Product ID: 20139924
Details
- Compatible DevicesLaptop
- Compatible MaterialAcrylonitrile
- Materialabs nylon pla
- Operating SystemLinux
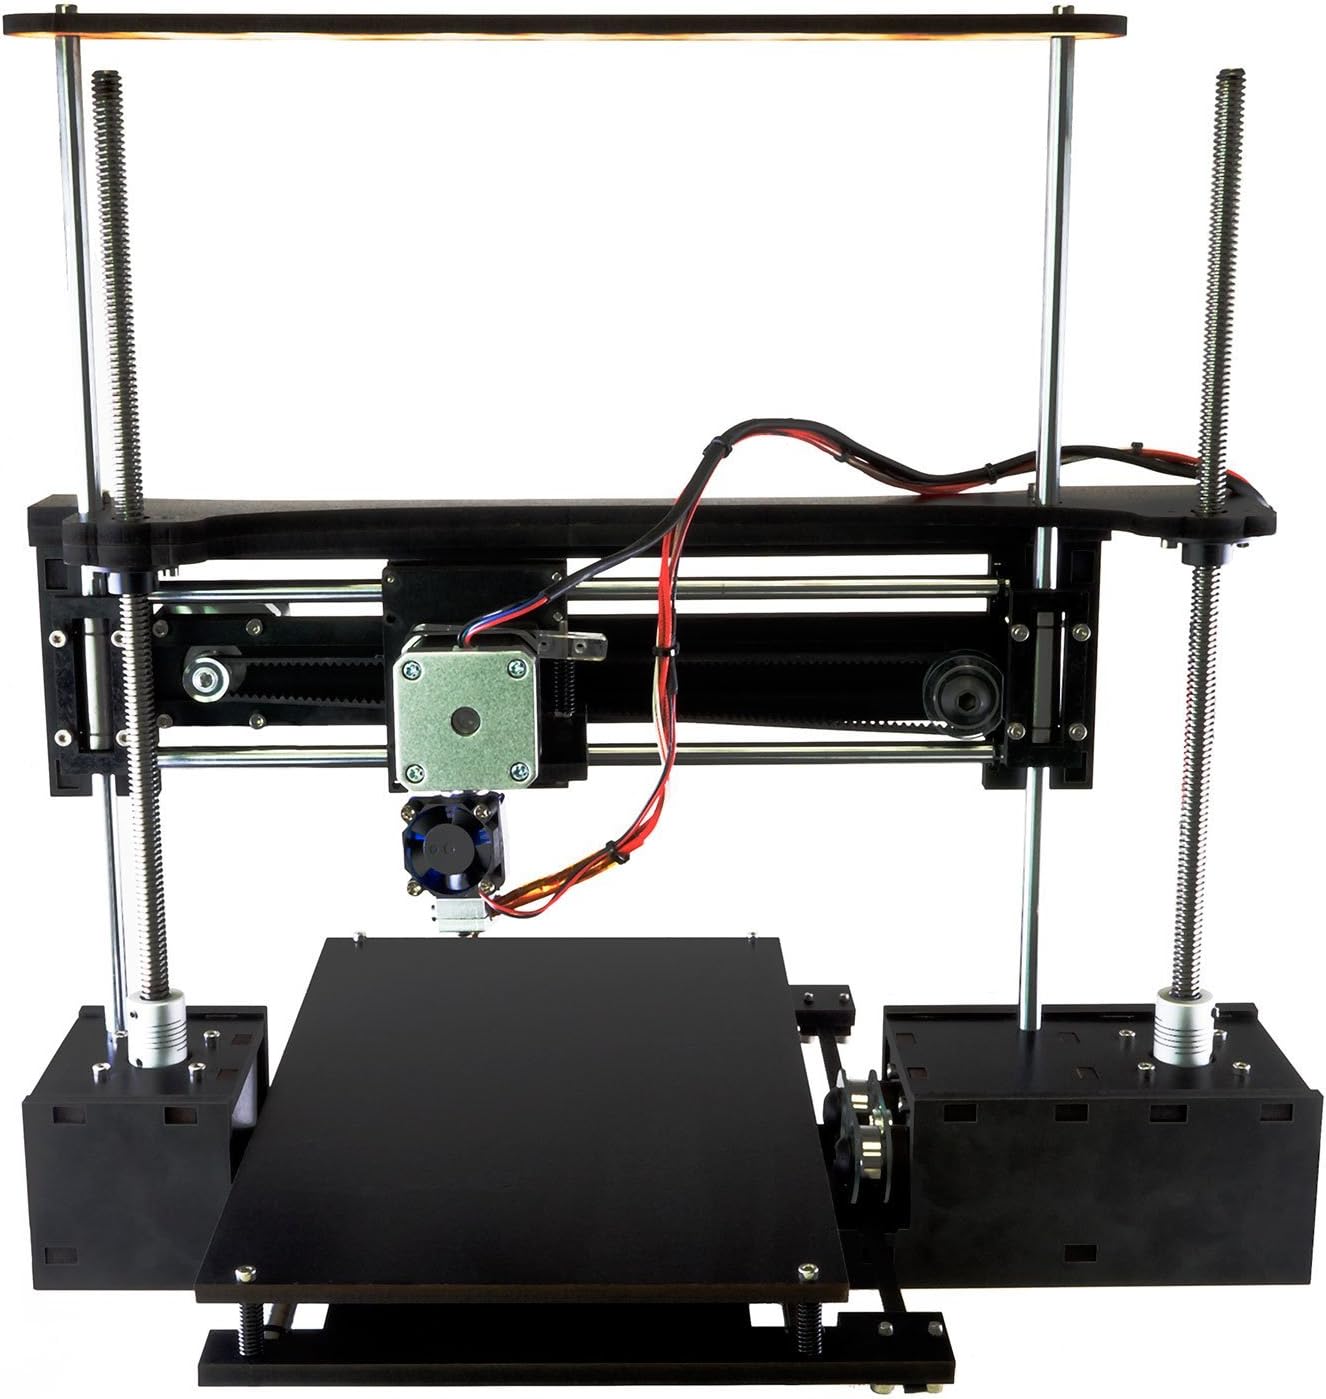
ThreeUp v2 3D Printer Kit 7" x 7" x 8.25" i3 Build Dimensions 50 Micron 1.75mm PLA ABS Nylon: desertcart.com: Industrial & Scientific Review: I also recently joined the local Austin Techshop for access to laser cutters and other equipment like this as well - I'm a new 3D printer user and decided to try a lower end model to learn more about the process, etc. I work in electronic design, so I'm familiar with the ideas. I also recently joined the local Austin Techshop for access to laser cutters and other equipment like this as well. I have a lot of respect for people that start a business like Q3D, put together these kits and contribute to the process. Thank you all for that. These are the issues that I had with my Q3D Three Up build and operation. Shipment: Prompt, fast and everything seemed to be well packaged. However, I was missing parts and ended up laser cutting my own replacement. Some other parts were cut incorrectly also, and made the mechanisms bind. I'm still waiting on delivery for over a week, but it's just after Xmas, so likely busy. MAKE SURE TO DO AN INVENTORY! Assembly: Took a couple of hours. I thought the structural components were acrylic, but it is Melamine, which has a hard The system is made from melamine MDF (basically compressed The instructions for assembly are for the oneUp and twoUp. These are clear and well made. It was not obvious to me that I needed to go through the two-up to threeup upgrade instructions to do the build. The threeup upgrade don't have pictures, so a bit harder to follow. Make sure that you layout the pieces and orient them correctly. This was important to understand how the panels are laid out for the smooth rods. I had mine flipped and had to disasemble to fix. The pieces fit reasonable well, but it's mainly made for 1 time assembly. You are basically using machine screws to go into particle/compressed cardboard. very easy to over torque and strip. I will be looking to upgrade to acrylic at least and see how this works. I was missing parts, and ended up laser cutting some replacements myself. They have the files on the their website for this which is good. Not sure of the vendor for the motors, as they had absolutely no markings on them. Seem to work OK. The hot end extruder is Ubis and does not attach well to the extruder assembly. This is causing lots of problems and very bad prints. Connecting the motors to the driver boards was unclear, as the color coding for the motors had changed, and it does not match the instructions. I had to look at the schematics to see the drive pins and then use a multi-meter to make sure the drive motor was pinned so that you can find the winding pairs. (look for low resistance on 2 pins, and this will be 1 of the 2 windings). I plugged these in, and if it moved the opposite way than expected, I flipped the cable plugged into the board. My final connection is in one of the attached pics. Remember the instructions could be wrong for your color coding. Testing: I had used Arduinos before, is familiar with the IDE. For this printer, I installed Repetier Host 1.6 with the Slicr slicing software. The process is that the Repetier is the control system, has a good 3D viewer for how to place the target object on the printer and has an interface for manual control of the motors, etc. Repetier seems to be a good tools, give you access to the low level G code, and integrates other tools well. It interfaces with the Arduino system via USB. The Arduino is running marlin firmware (preloaded) and uses a RAMP motor driver board from blue-tech.com. This has smaller motor driver boards. All the boards can be ordered separately, and all the schematics are online as well. The system has 5 motors - 2 for z axis to drive threaded rods on each side, 1 for X axis on the gantry, 1 for y axis to move the bed, and 1 for the extruder. Using the manual control, I tested each motor operation, and all worked except for the extruder. I swapped motor daughter boards and made sure the motor was OK by driving it from another port (X axis). I found that there were a couple of solder bridge shorts on the motor driver board that was causing the problem. I removed these, and everything worked! The solder bridges look like a blob of solder between 2 pins. You should not have any of these. A note on the electronics boards - This looks like it should fit onto something, but does not. It kinda hangs out on the side, and you have to figure out how to route wires and position the board so that it can support the movement during printing. I routed some of the wires on the gantry to keep these from interfering. attached pic of my setup. Using an broken/modified light arm as a spool holder (welded a bolt/pipe to this) Would recommend that Q3D check the shipment a bit more carefully, and also do a quick check on the boards before shipping. They had basic problems with both in my order. Also - Using Kapton tape, had some issue with first layer sticking, but worked well after I slowed it down. Also using PFTE based dry lubricant on the threaded rods. Using the liquid wrench lock and hinge dry lube with CERFLON (ceramically reinforced PTFE) - seems to help with the movement. Once I fixed this, I was good to go and ready to print. I found a bunch of calibration objects on Thingiverse. None of these printed well. There are a lot of setup procedures to go through still, but my main problem is that the extruder assembly is so loose. I then found out that the X drive gear attached to the motor had slipped, because the set screw was too short and did not go far enough in to prevent this. The flat part of the motor shaft is not that large either, and may have contributed to the slippage. While trying to work on this, the thin aluminum belt guide on the gear bent, and when I tried to straighten it, the whole plate came off. Now I have a shakey extruder connected to a non-stable gantry with a gear drive that will likely allow the belt to fall off. This is where I am at now. I will need to take the extruder assembly apart, cut this from acrylic and figure out how to prevent the wobble somehow. This is a good learning experience though, and since this is a reprap, I can upgrade what I need when I need. This is a reprap printer, and made with lower cost parts. The three-up adds another z motor (runs both in parallel) to stabilize the movement. Shipping came on time and I was very anxious to put this together. However, I quickly found out that I was missing some parts. This seems to be a common theme. I contacted the Review: Damaged and Defective - I purchased this item as a gift. (in December) I gave the gift recently and my son found that the melamine (MTF) boards were cracked (so he taped them together) then after the agonizing all day + assembly found that there were two axis' that didn't work. He did a diagnosis and found the motors were good, but the main board appears to be defective. I just tried to contact support (no answer, but, waiting) so hopeful for some resolution, but, after reading the horror stories in the reviews don't know what to expect. Unfortunately time has elapsed since purchase and don't know what recourse we have. Update:WARNING, BUYER BEWARE! do not buy from this company. We still have not had any resolution, nor any adequate support/communication. Pathetic. We have a door stop. Junk. Nonfunctional. The company does not support its products.
| ASIN | B013RVZN1Y |
| Customer Reviews | 2.8 2.8 out of 5 stars (21) |
| Date First Available | June 3, 2016 |
K**T
I also recently joined the local Austin Techshop for access to laser cutters and other equipment like this as well
I'm a new 3D printer user and decided to try a lower end model to learn more about the process, etc. I work in electronic design, so I'm familiar with the ideas. I also recently joined the local Austin Techshop for access to laser cutters and other equipment like this as well. I have a lot of respect for people that start a business like Q3D, put together these kits and contribute to the process. Thank you all for that. These are the issues that I had with my Q3D Three Up build and operation. Shipment: Prompt, fast and everything seemed to be well packaged. However, I was missing parts and ended up laser cutting my own replacement. Some other parts were cut incorrectly also, and made the mechanisms bind. I'm still waiting on delivery for over a week, but it's just after Xmas, so likely busy. MAKE SURE TO DO AN INVENTORY! Assembly: Took a couple of hours. I thought the structural components were acrylic, but it is Melamine, which has a hard The system is made from melamine MDF (basically compressed The instructions for assembly are for the oneUp and twoUp. These are clear and well made. It was not obvious to me that I needed to go through the two-up to threeup upgrade instructions to do the build. The threeup upgrade don't have pictures, so a bit harder to follow. Make sure that you layout the pieces and orient them correctly. This was important to understand how the panels are laid out for the smooth rods. I had mine flipped and had to disasemble to fix. The pieces fit reasonable well, but it's mainly made for 1 time assembly. You are basically using machine screws to go into particle/compressed cardboard. very easy to over torque and strip. I will be looking to upgrade to acrylic at least and see how this works. I was missing parts, and ended up laser cutting some replacements myself. They have the files on the their website for this which is good. Not sure of the vendor for the motors, as they had absolutely no markings on them. Seem to work OK. The hot end extruder is Ubis and does not attach well to the extruder assembly. This is causing lots of problems and very bad prints. Connecting the motors to the driver boards was unclear, as the color coding for the motors had changed, and it does not match the instructions. I had to look at the schematics to see the drive pins and then use a multi-meter to make sure the drive motor was pinned so that you can find the winding pairs. (look for low resistance on 2 pins, and this will be 1 of the 2 windings). I plugged these in, and if it moved the opposite way than expected, I flipped the cable plugged into the board. My final connection is in one of the attached pics. Remember the instructions could be wrong for your color coding. Testing: I had used Arduinos before, is familiar with the IDE. For this printer, I installed Repetier Host 1.6 with the Slicr slicing software. The process is that the Repetier is the control system, has a good 3D viewer for how to place the target object on the printer and has an interface for manual control of the motors, etc. Repetier seems to be a good tools, give you access to the low level G code, and integrates other tools well. It interfaces with the Arduino system via USB. The Arduino is running marlin firmware (preloaded) and uses a RAMP motor driver board from blue-tech.com. This has smaller motor driver boards. All the boards can be ordered separately, and all the schematics are online as well. The system has 5 motors - 2 for z axis to drive threaded rods on each side, 1 for X axis on the gantry, 1 for y axis to move the bed, and 1 for the extruder. Using the manual control, I tested each motor operation, and all worked except for the extruder. I swapped motor daughter boards and made sure the motor was OK by driving it from another port (X axis). I found that there were a couple of solder bridge shorts on the motor driver board that was causing the problem. I removed these, and everything worked! The solder bridges look like a blob of solder between 2 pins. You should not have any of these. A note on the electronics boards - This looks like it should fit onto something, but does not. It kinda hangs out on the side, and you have to figure out how to route wires and position the board so that it can support the movement during printing. I routed some of the wires on the gantry to keep these from interfering. attached pic of my setup. Using an broken/modified light arm as a spool holder (welded a bolt/pipe to this) Would recommend that Q3D check the shipment a bit more carefully, and also do a quick check on the boards before shipping. They had basic problems with both in my order. Also - Using Kapton tape, had some issue with first layer sticking, but worked well after I slowed it down. Also using PFTE based dry lubricant on the threaded rods. Using the liquid wrench lock and hinge dry lube with CERFLON (ceramically reinforced PTFE) - seems to help with the movement. Once I fixed this, I was good to go and ready to print. I found a bunch of calibration objects on Thingiverse. None of these printed well. There are a lot of setup procedures to go through still, but my main problem is that the extruder assembly is so loose. I then found out that the X drive gear attached to the motor had slipped, because the set screw was too short and did not go far enough in to prevent this. The flat part of the motor shaft is not that large either, and may have contributed to the slippage. While trying to work on this, the thin aluminum belt guide on the gear bent, and when I tried to straighten it, the whole plate came off. Now I have a shakey extruder connected to a non-stable gantry with a gear drive that will likely allow the belt to fall off. This is where I am at now. I will need to take the extruder assembly apart, cut this from acrylic and figure out how to prevent the wobble somehow. This is a good learning experience though, and since this is a reprap, I can upgrade what I need when I need. This is a reprap printer, and made with lower cost parts. The three-up adds another z motor (runs both in parallel) to stabilize the movement. Shipping came on time and I was very anxious to put this together. However, I quickly found out that I was missing some parts. This seems to be a common theme. I contacted the
B**D
Damaged and Defective
I purchased this item as a gift. (in December) I gave the gift recently and my son found that the melamine (MTF) boards were cracked (so he taped them together) then after the agonizing all day + assembly found that there were two axis' that didn't work. He did a diagnosis and found the motors were good, but the main board appears to be defective. I just tried to contact support (no answer, but, waiting) so hopeful for some resolution, but, after reading the horror stories in the reviews don't know what to expect. Unfortunately time has elapsed since purchase and don't know what recourse we have. Update:WARNING, BUYER BEWARE! do not buy from this company. We still have not had any resolution, nor any adequate support/communication. Pathetic. We have a door stop. Junk. Nonfunctional. The company does not support its products.
J**N
but It's actually surprisingly great. It's not even loud
After about 4 hours assembly time I have just run the first few test prints. After some me of the reviews I was careful with my expectations, but It's actually surprisingly great. It's not even loud. During assembly the pieces may not always fit perfectly, but the design means it mostly has a tight reliable fit where it matters. It's not all roses, I had to do some modifications to the extruder assembly as the nema motor in the kit stops the filament tensioner getting close enough, and the X belt is tight so the tensioner for that sits slightly off straight. The most endemic issue is that machine screws can be overtightened in melamine, but some longer screws and nuts should fix most of those pain points. To be honest though that's all about what I expected, and the actual hardware is of very nice quality for a kit of this price. I suspect a lot of the complaints are from people with different expectations, breaking out some tools and making do is something I enjoy, so no complaints here. That's not to say it couldn't be improved a lot with some fairly small tweaks though. The software worked flawlessly first time and the electronics appear to be high quality (arduino mega + board + extruder +'power supply). In the end I doubt I could have put this together for less, and now it's functional I can simply print the most urgently required improvements.
D**A
... printer but I have to say it is the best. For the incredible price to get you started ...
You get what you pay for and I've seen a lot of complaints about the build quality with this printer but I have to say it is the best. For the incredible price to get you started it is a great product. Most of the pain with this printer is trying to deal with a the fact that 3D printing is not at a consumer level but if you want to challenging hobby and you don't have a lot of money to spend on a high end printer this printer will give you a hell of a challenge. That said, the rewards once you get everything dialed in are just glorious. Also, I was missing a belt with my kit, but contacted customer service and was sent a replacement right away.
Trustpilot
3 weeks ago
2 months ago