
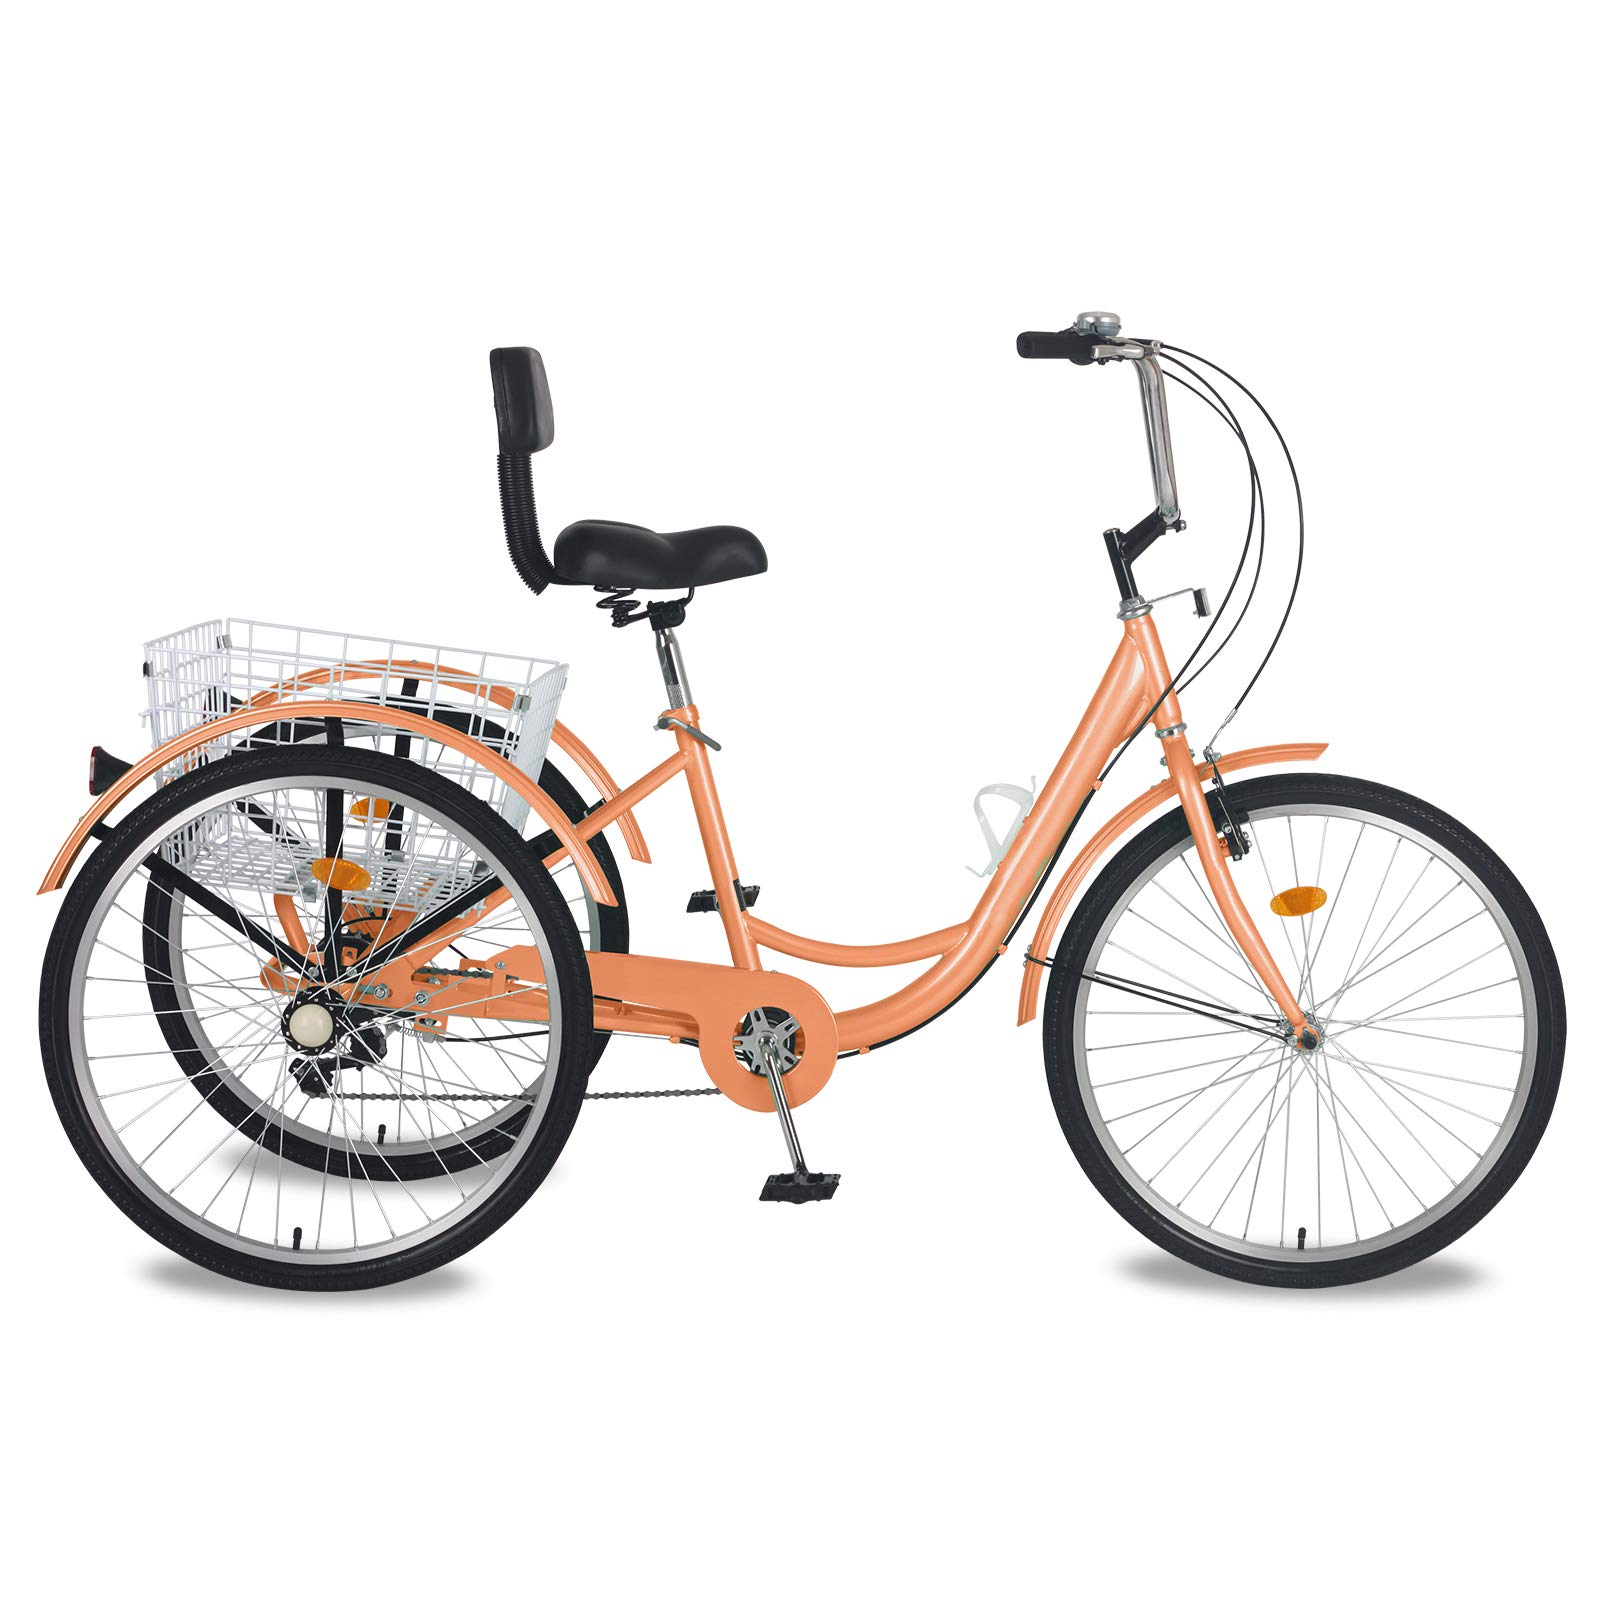
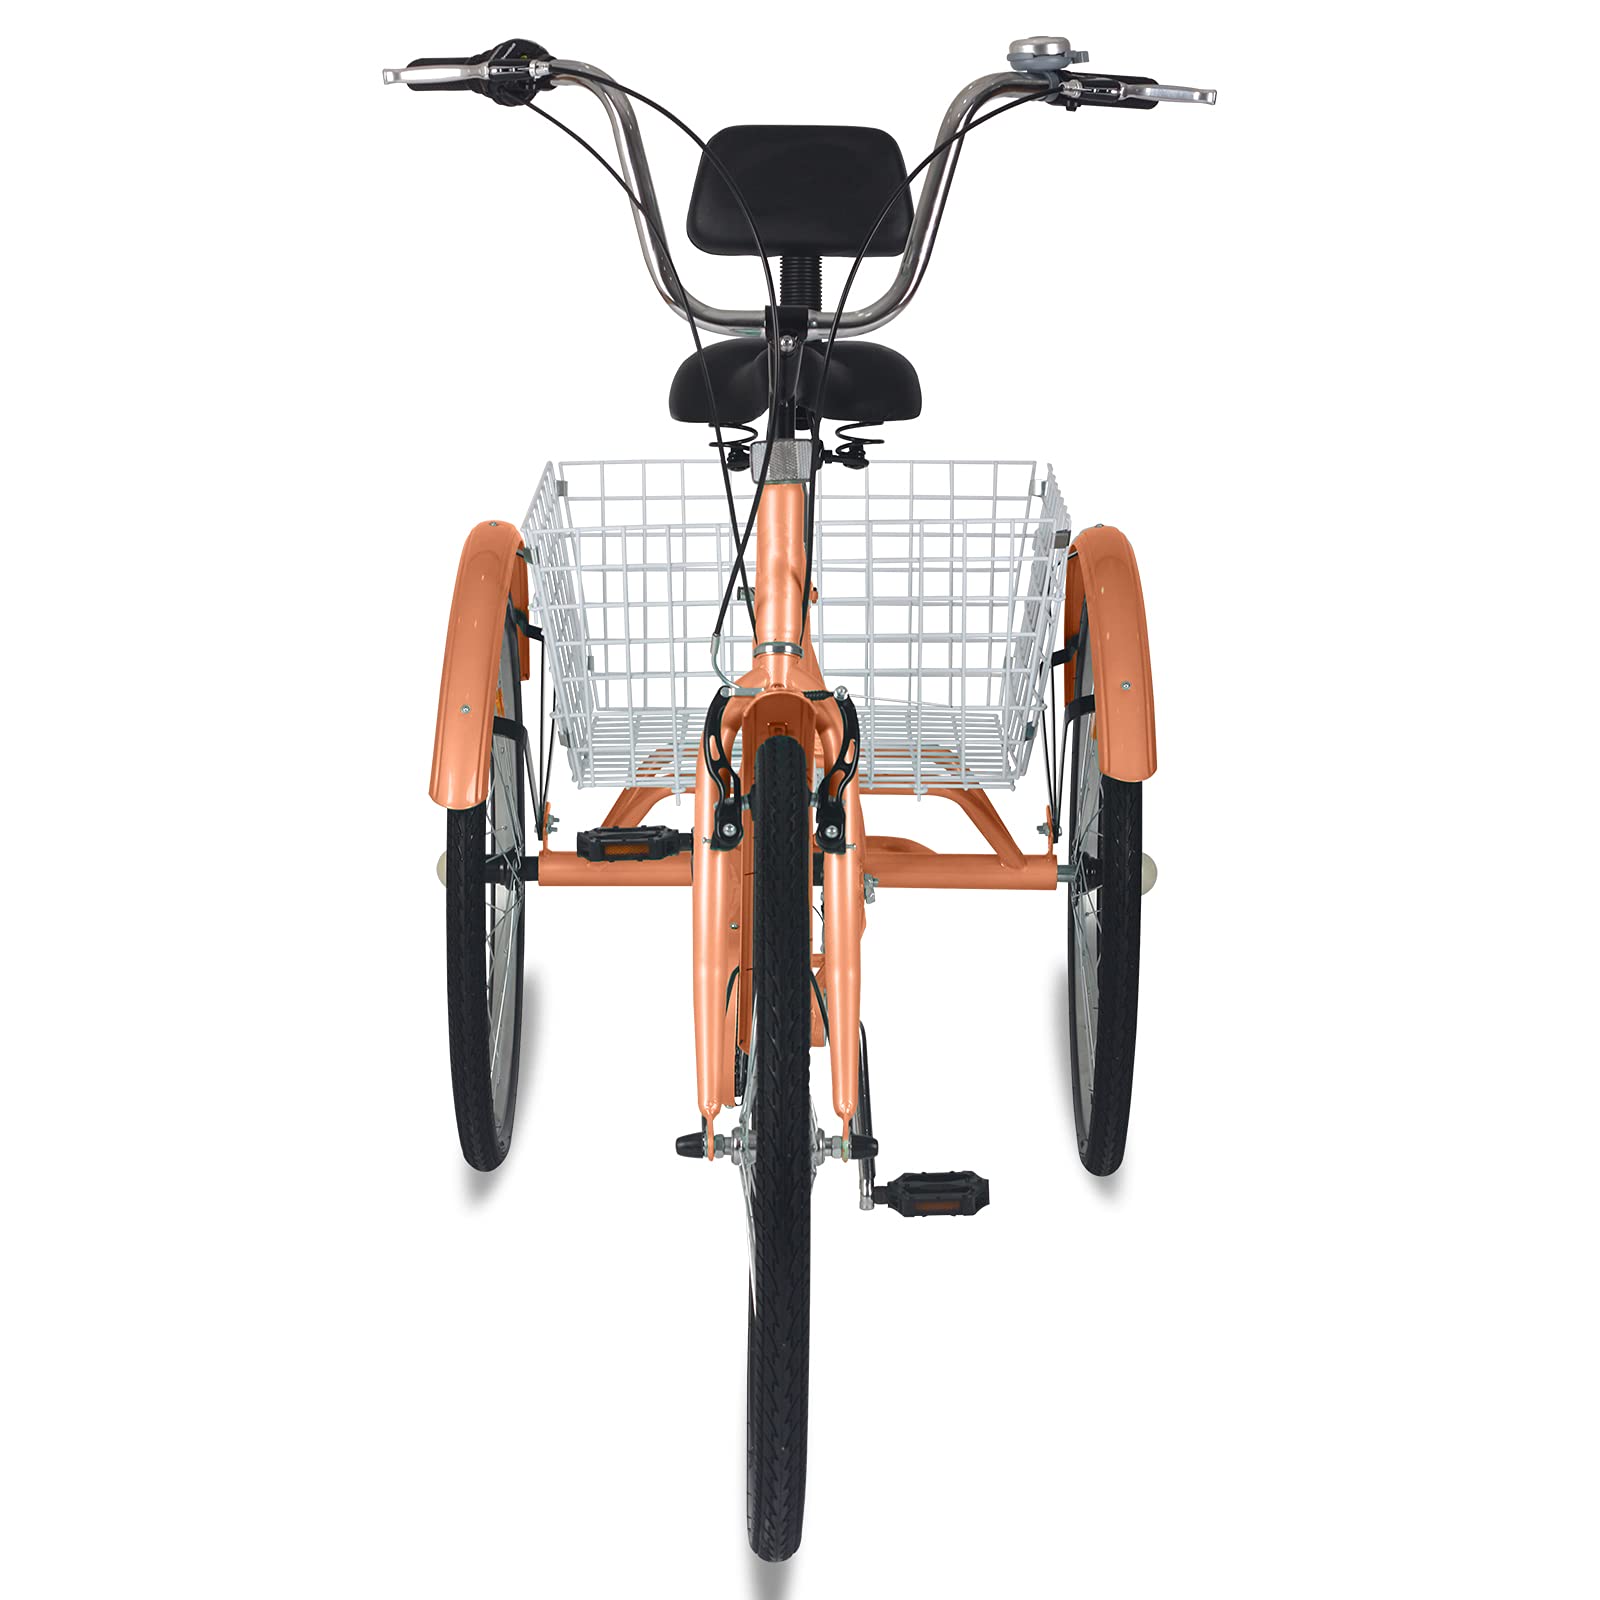


Full description not available
N**D
Pay attention to details and read instructions!
Interesting reading, the reviews! For those of you brave enough to try to put this bike together yourself, I thought I would give you a step by step review of what I went through during the 10 hours over 3 days it took to put the bike together. If, after reading this, you still want to put one together, then please be sure to print this review and use it as you go along.Overall, I give this a 2.5 rating because of the difficulty of installation, and confusing instructions. The bike itself is not bad for the price. Unless you are mechanically inclined, and VERY patient, I highly recommend that you have a bike shop put this together for you.WARNING…BEFORE YOU START!!!Please look at the bike frame to see which side the chain sprocket is on! Reason:The pictures in the instruction book show one with the sprocket on the right side, and one with the sprocket on the left side of the frame, and the pictures keep changing between the two. I finally figured out that some pictures showed the bike turned upside down, so the sides kept changing! Also, if you do not put air in the tires, they will come off the rim during installation!Step 1: Rear DerailleurThis install was simple enough, once I figured out that my bike was laid out the reverse of the pictures (took me one hour to do so).Step 2: Rear WheelPay close attention to the pictures of each wheel so you get the right and left wheels on the correct side. Also, do not lose the metal tube for the left axis, or your wheel will not turn!Step 3: Rear axle and frame installationMy bike had a shaft with threads installed between the rear axle connectors, which completely threw me off, since it was not shown in the instructions (did not need it!) Again, the pictures may be reversed, so pay attention!Step 4: Installation of the chainThis is a tricky one! Pay close attention to how you start to feed the chain on the guide wheel! The first pictures show the guide wheel in the upside-down position, and then change to the right side up position. Also, using the chain rivel extractor is tricky. Be sure that the end of the screw head on one side of the extractor is flush to where the chain will go, since it is used as a stop for the pin. Then use the handle on the other side and tighten down the pin until you can’t turn it any more, otherwise the pin will stick out of the side of the chain!Step 5: Chain coverThis is pretty straight forward. Just don’t lose the screws!Step 6: Front Fender InstallationThis is pretty straight forward. Just check that the fenders are not bent.Step 7: Front Wheel InstallationPretty straight forward. Just male sure that the hook on the washer goes into the hose in the top of the fork on the frame.Step 8: Bell and reflectorsThe picture showing the bolt on the front reflector is totally different from what was sent. I had a screw instead of a nut and bolt. Also, my wheels came with the reflectors already installed on the spokes.Step 9: Rear Fender InstallationPay close attention to be sure that the fenders are placed so the reflectors are on the rear of the fender and not the front (I had to take them off and turn them around!). Also, the fender supports go between the wheels and the frame, NOT on the inside! Otherwise, you can’t tighten the bolts.Step 10: Handlebar InstallationPretty straight forward, but you have to really TIGHTEN the hex nut very hard to keep the handle bar from moving sideways and up and down when you start to ride the bike. Also, be sure to align the middle of the handlebar with the front wheel so it is not cocked to one side.Step 11: Saddle InstallationPay attention to the difference between the side with the bolt head, which tightens the sideways movement, and the side with the nut, which tightens the up and down movement of the seat. Again, need to tighten REAL TIGHT to keep the seat from moving when you mount the bike.Step 12: Pedal InstallationStraight forward, but be sure to put the pedals on the correct side. Each is marked with either a L or R to denote the side. Also pay attention to be sure it is not a counter-clockwise thread.Step 13: Front Brake Installation (PITA…Pain in the …)This is a difficult installation because you MUST pay attention to how you attach the brake cable to the brake lever to keep the cable from coming out of the lever, and that the “noodle” is properly seated in the brake carrier. Adjusting the brake is very important, so be sure to carefully read how to align and adjust the pads, otherwise they will not stop the wheel when you apply the brake (it took me 4 tries to get this correct).Step 14: Shifter Cable Installation (another PITA!)The most important pictures and information here, are on the last page of this step, because you have to put the front shifter into position 7, and the chain on the smallest free wheel BEFORE you start the cable installation, or the adjustment will not work!Pay attention to the fact that you will have TWO cable housings to install, and each one has to go in a certain order. The biggest problem with this installation is that the shorter housing connects under the frame between the derailleur and the last housing slot on the frame. The first cable housing stops at the first housing slot under the frame, and the cable will remain exposed in the area between these two slots under the frame (which is kind of show in the pictures). Also, you will need to adjust the cable housing loop so the end of the short cable housing can be installed into the screw hole on the derailleur. AND contrary to what the pictures show, the cable gasket nut is NOT colored in red! Be sure to really pull hard on the cable before you tighten the nut on the cable, or the shifter cable will not properly engage the shifter to change gears (thus the comment that one person rides in third gear all the time!). Also pay close attention to adjusting the rear derailleur or the chain and sprocket gears will not align properly.Step 15: Rear Brake InstallationSame warnings as the front installation (see step 13 above). Also, DO NOT lose the brake spring, or you will not be able to complete this step! Also, there was no green screw hole on my bike, so I just looked at the picture. Again, be sure to REALLY PULL on the cable before you tighten the screw or the rear brake will not work!Step 16: Rear Basket Installation (multiple PITA!)The pieces do not align with each other and the pieces have to be bent to get them to come together. HELPFUL HINT: I used plastic zip ties to hold the 4 sides to each other while I used the metal pieces to tie the sides together, then cut them loose. Also, I attached the base to the rear of the bike before I put the sides on, otherwise you will need someone to hold the sides for you.YAY…WE’RE DONE! HAPPY RIDING!
S**S
Definitely a must have
I was able to put the entire bike together on my own although I used personal tools -- not the ones sent with bike. It took longer than the directions stated AND the pictures in the directions were not helpful. I ended up looking at my other bikes to know how to put the pieces together. There did end up being some slip/play in my gearing so I did take it to a professional to have that area adjusted. Prior to taking it in, I did take it out for a ride!! It was great! I got a number of compliments and I definitely enjoyed the stability!
D**.
Zoom Zoom love my Trucycle!
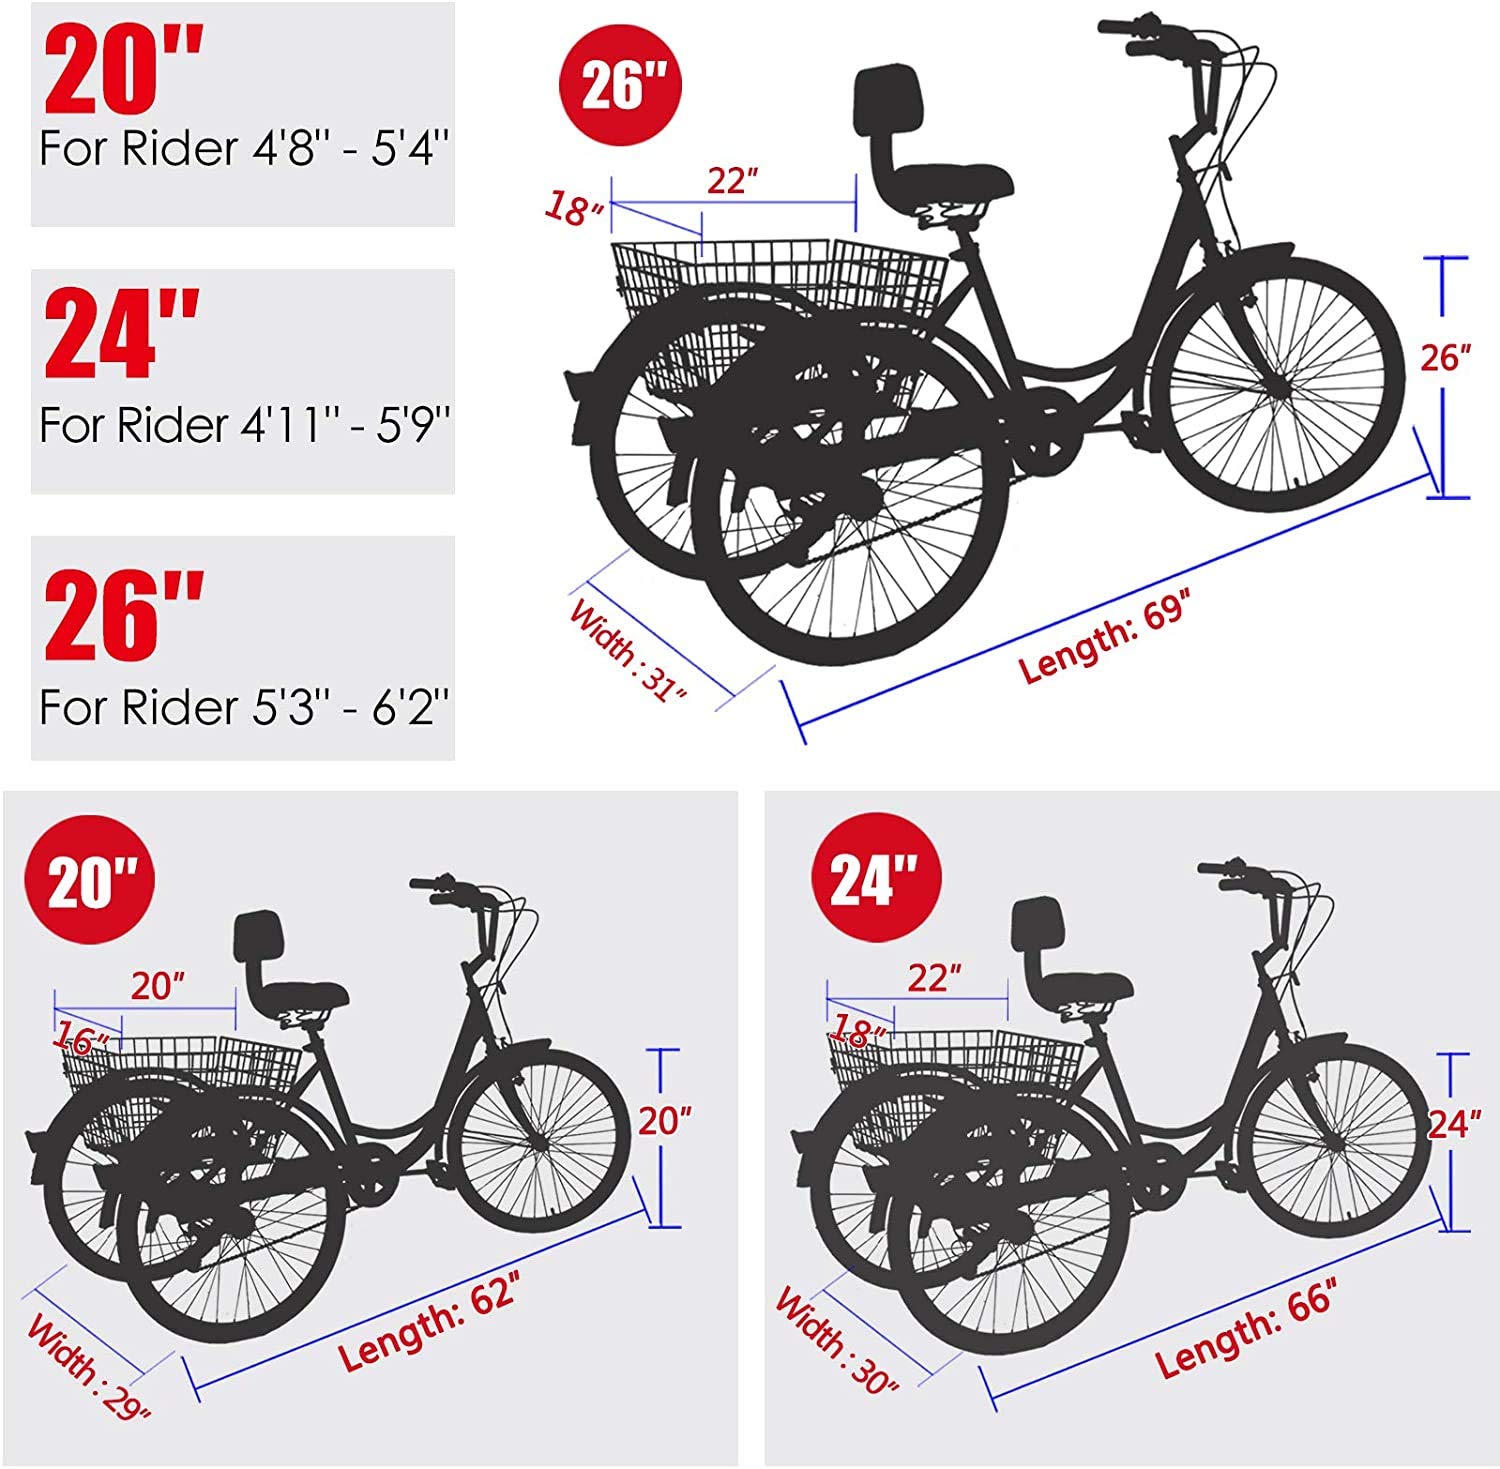
Love the trike! I feel more comfortable with the 3 wheeler at 68 years old and I always wear a helmet. The 24 inch is perfect for my 5’ 2” height. I returned a 26 inch because it was too big and difficult to maneuver and I am shrinking every year. I especially like the 7 speeds. As a novice I keep it in 1 and it is easier to pedal. I also like the 3 handbrakes. The back right brake makes me feel more secure. The most difficult part is putting this together. Hire a professional it is well worth it.
T**N
Awesome, but a lot of effort
Fortunately I really enjoy putting things together, because this was a beast. The directions are beautiful, but not very helpful, so if you've never assembled a bike (I had not), this can be a very challenging project. Part of the frame was bent, but I was able to correct it, and some of the parts were shipped in a BASF Chemicals bag, which was weird and smelled awful, but for the price we ended up with a great trike that's a lot of fun.
J**X
Great bike for anyone, especially seniors with knee or balance issues.
I’ve only had this bike for a week and I’m truly enjoying it. At 75 yrs with bad knees, my physician had recommend a tricycle for exercise and it’s so nice to be able to pedal anywhere I wish now. I gave it 5 stars for ease of assembly simply because the bike shop had no problem and found no missing pieces. Having read previous reviews, I decided to spare myself aggravation. It seems quite sturdy and is easy to handle. I feel quite stable when riding it. I’m very pleased with this purchase.
S**K
Company responds quickly
This bike is great! A couple things- the directions are hard to follow. It took my husband 2 days to out together. Second, after riding it for a week or so, the right pedal and crank became stripped. Sent a message to the company and they sent new parts within 10 days. Replaced the parts and it is fun to ride. I also got orange to match my car. ☺️
V**A
Where having fun!
I've never been on a bike and I'm over 50, it's easy to ride. My husband assembled it, he followed instructions and it took 1 hr a day for 1 week to finish. We hade problem shifting the gear, so we left it on 3 permanently. Nice ride.
S**D
I love my bike and I got it today May 15th
I love the coloring because people like will my neighborhood like to not paying attention to people walking or biking and I figured like orange color that means so when riding a bike and I love the color I love the bike I did work on it today I put all the time in to putting together and my friend help me to treat soup bites to help me make sure it's safe for me to hide
Trustpilot
2 months ago
3 days ago
