✨ Light Up Your Imagination with iCubeSmart! ✨
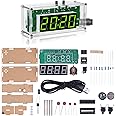
The iCubeSmart3D LED Cube Light DIY Kit is an innovative electronic toy designed for children and teenagers, featuring a 3D matrix of 512 RGB LEDs that can display a variety of colorful animations. This user-friendly kit includes a pre-soldered PCB and allows users to create custom animations using provided software. With a compact size of 18 x 18.5 x 20 cm, it serves as an excellent educational tool for manual electronic manufacturing classes and a unique gift for budding tech enthusiasts.


R**N
Anode and cathode wrong way round in image in instruction
Cool
R**.
Défi de soudures
Un vrai challenge en soudure, pour un résultat esthétiquement très réussi.
J**S
Well worth the time and effort
This was an awesome project for me and my grade nine daughter. Lots of time to solder it all together but we'll worth it in the end. Now we just need to get into programming our own light patterns. The ones that come standard are great.
M**.
It takes some time
The media could not be loaded. I bought my Icubesmart 3D8S RGB Nov of 2018 and it sat on my office desk until last week (mid Feb 2020). The soldering is pretty simple but tedious. Connecting each panel to each other properly takes some patience.The documentation, as people mentioned is seriously lacking, especially with the Windows based applications. I had OCX discrepancies and trying to follow the "non english" picture directions (which didn't match what the installation program was even doing) drove me batty for 2 days. I tried on an HP Win10 laptop and an HP WinXP laptop. The programming application would not load on the XP, but it ran when I extracted the cab files to the same directory as the executable, which was a shock to me. I was able to locate the proper XP driver for USB programmer too. I never got either to work on my Win10 laptop.After 10 different solder repairs (I fancy myself a pretty decent solderer, I don't know why the thing doesn't stay together), the cube worked, and I was pretty happy with the different pre-loaded displays. But, no rain. I wanted a cube just for the rain effect. Ok, time to learn the "Make your own Displays" program". Wow, how horrible. But, I was able to open the existing example files and reverse engineer how the application does what it does.Now to the programmer. What a POS. I have to keep hitting the program button in the app and quickly attach the 5v wire before it times out and fails.... lather, rinse, repeat, over and over. Just frustrating. I even bumped the baud down to 9600. I can always eventually get it to work and I am able to upload my own written displays. I will probably modify the connector with a small toggle switch on the 5v wire.You have to seriously think out the timeline of the display you are making. I spent a lot of time running the "debug" to test what I had just wrote, and it would always crash ofter 5 runs. (Not the app, just debug, I would have to save the display, exit out of the program and restart it.) If you make a mistake in the middle, it is so time consuming to try and fix.Too bad there isn't a share repository for icubesmart hex files. (Hex files created by other LED cube programs are not compatible, yes I tried). It, would have been great if I had bought the model that had an audio input. One last comment, after dropping Windows for mac years ago, it would have been nice if there were mac apps for it or it was able to be easily connected to an Arduino.With all the shortcomings, I still give it 5 stars because, it's pretty cool. I have spent 2 days writing and testing my version of "Rain" with splashes, and it looks phenomenal in low light settings (The iPhone video does not do it any justice). I was thinking of next going for the 16x16x16 RGB (voltage color changing) LEDs next, but, wow. not going to do that.
L**E
PAS GRAND
attention petit format
F**Z
Challenging and rewarding!
First off, if you're looking for a project to practice basic soldering skills, this is not what you should start with! This is an advanced project that requires a massive amount of soldering anode-to-anode and cathode-to-cathode of LEDs.If you have some experience with soldering electronics kits, this one is well worth the effort. It took me 12-16 hours to complete, although I'm still troubleshooting a few LEDs that I didn't solder well enough. Make sure you check your solder joints thoroughly before you begin assembling the eight layers into a cube! Trying to weasel a soldering iron and solder into the center of the cube to repair a broken solder joint is... frustrating. If there's one thing I would do differently, if I were to do it again, it would be to make certain each connection had a very strong solder joint.I highly advise buying the acrylic case for the cube, because it requires the protection. As I mentioned previously, the solder joints are delicate, and unintentional jolts and bumps can break them. Be careful when moving the cube from place to place - pick it up and set it down GENTLY. It's a good idea to find a semi-permanent location for the cube, unless you want to constantly remove the acrylic case to repair broken solder joints.This is cube is SO cool. Plugging it in for the first time was extremely rewarding. The built-in patterns are awesome, and there are plenty to choose from. It's bright and looks amazing in a dim or dark room. Caution: if you have a seizure disorder, you want to be careful with this! Some of the patterns are pretty intense.Perhaps most important, it's a project that keeps you fully-engaged from start to finish, which in an age of pandemic stay-at-home orders, is a really good thing! It did a great job of distracting me from being stuck in the house. I would buy this again in a heartbeat.
Trustpilot
3 weeks ago
5 days ago