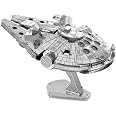
🚀 Build Your Legacy with the Millennium Falcon!
The Metal Earth Star Wars Millennium Falcon 3D Metal Model Kit is a challenging and rewarding hobby model designed for ages 14 and up. This unassembled kit features 94 precision-cut steel pieces that require no glue or soldering, making it easy to assemble with just tweezers. Once completed, the highly detailed model measures 2.83"L x 2.2"W x 1.81"H, perfect for display and a must-have for any Star Wars collector.


| Material Type | Steel |
| Size | One Size |
| Number of Pieces | 94 |
| Item Weight | 0.02 Pounds |
| Item Dimensions | 6 x 1 x 8 inches |
| Additional Features | Iconic Star Wars subject matter, 3D metal model kit, no glue or soldering required, highly detailed, metal material |
| Scale | 1:146 |
| Subject Character | Chewbacca |
| Seasons | All Seasons |
| Theme | Star Wars |
| Color | Silver |
P**D
Best Metal Earth kit I've built so far
This is the 8th kit from this company I've built now (5 planes, 2 tanks). Of these kits, this is my favorite based on the enjoyment in building the kit, the challenge, and the finished product (not to mention the cool subject matter).On a scale of 1-5, I would rate the difficulty as 4. Generally the most challenging part of these kits are the pieces that require rounding or shaping. The few pieces that required rounding were fairly easy/straight-forward. The most challenging piece is the cockpit. If this is your first Metal Earth kit, this piece may require some patience to mold properly.My favorite part of this kit is the detail of the finished product. The finished piece isn't simply a basic representation, but a fairly detailed one with a lot of depth and texture. I liked the recessed vents, fins, and raised areas that really added detail to this model.This kit contains more pieces than some of the simpler Metal Earth kits, and it shows in the final model. This makes the construction more enjoyable. As with other reviewers, this kit also took me 3-4 hours to complete. I would disagree with the comment on twisting of the tabs by one reviewer. Connections tend to be much stronger with a twist tab join, so these can/should be used on areas that will not be seen on the completed model.Regarding bad reviews by others: Be careful when reading the bad reviews posted by some. Some people blame their inability to complete this style kit on the kit itself. Don't be fooled, the kit itself is very high quality. The detail is superb, and the metal pieces are sturdy if you don't bend them repetitively (as you would if you made a mistake). Hence, I continue to recommend these kits to experienced builders with good manual dexterity.
J**N
So cool great details
Absolutely awsome assemble moves very smoothly
P**K
Fun little project a must try.
Tools are definitely needed. watch how to videos it'll help you. It's challenging and fun.
B**0
Super Fun and Super Tiny
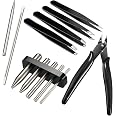
Loved it. This is my second one. I did the Black Pearl first and found that extremely difficult, maybe because it was my first one and it took some getting used to working with metal, which I've never done before. I'm almost ashamed to say The Black Pearl took me 3 months to complete, but it did. I kept getting frustrated and would put it away. I didn't want to risk breaking any pieces. Eventually I learned little tricks to overcome my obstacles. The Millenium Falcon took me all of 4 days to finish, and the pieces were much smaller. I was hoping for a little more challenge. I'm ordering a couple more because I do enjoy them.Tools I use:Tweezers - great for placing pieces, but especially for twisting the tabs and bending/creasing at the folds.Pocket knife, very sharp - the pieces are in precut sheets and need to be "snapped out". I place the sheet on a flat and firm surface and then place the blade of the knife where the tab meets the piece and then push straight down for a nice clean cut.Small File - to clean up any edges from when the piece is snapped out.Bic Pen and a golf ball - alot of the pieces need to be curled or bent. A dismantled Bic pen provided three different size "curling tools". The golf ball is good for rolling larger pieces into a uniform shape.If I planned on doing this full time, I would invest in some magnifying glasses. The tabs are the size of a medium sized freckle and the slots they fit in are about 1/4 that size. We're talking very, very tiny pieces.Excellent instructions, super easy to read - almost elementary level, and there are 360 views on the manufacturers website if you need a good visual.
B**T
CHEWY!!!!
The media could not be loaded. SO COOL!!! I enjoy putting these together and have done about twenty of them, I am far from an expert and my first three ended up a wad of twisted metal, rage and profanity with a one star rating. There is a special way to assemble because these are not typical models.TIPS AND TRICKS:Don’t waste your time with the special tool sets or needle nose pliers (they didn’t work for me). I recommend getting tweezers with different tips. There are many times where you will be holding a piece with one set of tweezers and twisting/bending/inserting tabs with another and many times you have to reach tabs inside a small piece you have already made. Attempting to assemble this all by hand became impossible for me. Tweezer were needed.Buy some really small, fine point wire cutters. The package says just pop out the pieces for assembly but when they are very small they do not “pop out”. They bend and just make a mess, so snip the points where they are connected and now they will easily pop out.Get yourself some nails of various sizes to help transform flat metal pieces into cylinder shapes. I use different sized nails, cables, pens and markers of all different sizes to round some parts of these models. Whatever you use just make sure you can slide the model part off one end. Trying to round using tweezers is possible but doesn’t look as professional.Don’t get mad if you break some pieces, just keep a small bottle of quick drying, clear super glue. I’ve broken many tabs and pieces. It just happens sometimes, if you fold pieces to many times it will break, read the instructions wrong and have to undo folding and bending they can break. Use small amounts of super glue and apply with a needle and you can hardly notice you used it once it has dried.Some of the instructions are a bit unclear so look at the pictures closely and even the pictures of the next few steps. The directions are not very specific and won’t tell you exactly which way a part is meant to be bent, or engraved side in or out. Putting together a 3D model from 2D parts and directions can be confusing. Green triangle means twist tab and blue circle means to bend tab down.If you get lost using their included flow chart, just know that the parts go on in numerical order.You can see from my video that these are far from perfect but being able to complete them is a satisfying feeling. The rotating display is by Facinations and is solar powered. It works well indoors and works fine with just the lights in the room but do not work well in shady areas but it does take a battery if you want. Take your time, take breaks, have fun!
L**
Amazing
I purchased this for my boyfriend as a part of his christmas gift, for reference he wants to be an engineer so building legos is relatively easy for him. It took him an entire month (he also works) to build this which says a lot. He said he loved how challenging it was!
Trustpilot
4 days ago
2 months ago