Desertcart purchases this item on your behalf and handles shipping, customs, and support to Belgium.
🍶 Elevate your gut game with every creamy spoonful!
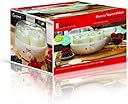
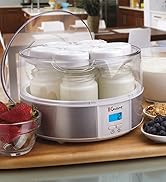
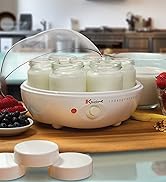
The Euro Cuisine YM80 Electric Yogurt Maker empowers health-conscious millennials to effortlessly craft up to seven varieties of fresh, probiotic-rich yogurt at home. Featuring a built-in timer, transparent lid, and dishwasher-safe glass jars with BPA-free lids, it combines convenience with customization—perfect for those seeking preservative-free, tailored nutrition backed by a 3-year warranty.


| ASIN | B000EX16RY |
| Best Sellers Rank | #27,681 in Kitchen & Dining ( See Top 100 in Kitchen & Dining ) #8 in Yogurt Makers |
| Brand | Euro Cuisine |
| Brand Name | Euro Cuisine |
| Capacity | 2 pounds |
| Color | White |
| Customer Reviews | 4.4 out of 5 stars 5,650 Reviews |
| Global Trade Identification Number | 00737770462263, 00885289208503 |
| Included Components | 7 -6Oz Glass Containers, Euro Cuisine Ym80 Yogurt Maker |
| Item Dimensions L x W x H | 9.5"L x 9.5"W x 6"H |
| Item Type Name | Yogurt Maker |
| Item Weight | 4 pounds |
| Manufacturer | Euro-Cuisine, Inc |
| Material | Glass |
| Model Name | Yogurt Maker |
| Model Number | YM80 |
| Number of Items | 1 |
| Operation Mode | Automatic |
| Other Special Features of the Product | Built-In Timer |
| Part Number | YMX750 |
| Product Care Instructions | Dishwasher Safe |
| Recommended Uses For Product | Residential |
| Special Feature | Built-In Timer |
| UPC | 885289208503 885388247953 778295071189 737770462263 885550515231 787461497814 885255414976 885468280672 885191692124 885468025105 885681368775 |
| Unit Count | 7 Count |
S**O
YM80 suits my needs perfectly
This review is for the YM-80 model. I had previously owned the YM-100. It performed very well for a number of years but recently gave out on me (started heating unevenly). I do feel I got my money's worth from that yogurt maker, because it got used hundreds of times. However, I realized I had not been using the shut-off timer feature, so I decided to go with the cheaper YM-80 unit this time around. After having used it, I believe this one was the right choice for me. The YM-80 is very similar to the YM-100, with the exception that it does not include a timer. You will see numbers on the side of the unit; these do not really serve a countdown purpose. There's a notch in the lid that you can position at one of the numbers, the idea being that the number represents the time you want to turn the yogurt maker off. So if you are doing something that will take 12 hours and you start at 8 in the morning, you'd put the little notch at 8 to remind yourself to take the yogurt out at 8 PM. I am not using this feature, but it's there if you want it. The jars are the same for the YM-80 and YM-100, so now I have an extra set of jars. I do like the jars. I find that they are a good serving size (6 ounces) and I'm very happy that the yogurt never touches plastic (the lids are plastic but you do not use them while you are incubating the yogurt). You should wash the jars prior to the first use and after every subsequent use. If you use a non-heated dry, you can put the lids in the dishwasher as well (I use the silverware basket for the lids). The lids screw on and off and are very easy to put on and take off, but are also fairly secure when on (though I would not suggest turning the jars upside down -- that would be pushing your luck). Here is the procedure I typically follow for making yogurt (I always make dark chocolate/cherry yogurt): 1) Heat 5 cups of skim milk to 185 degrees Fahrenheit (this kills any bacteria already present in the milk) 2) Chop up 2 ounces of unsweetened chocolate (I use the Bakers baking chocolate) and put it in a heat-proof bowl 3) When the milk is hot, remove it from the heat and pour it over the chopped chocolate; mix with an immersion blender or hand mixer (a spoon is not really enough) 4) Stir in a packet of nonfat milk powder (wherein one packet is equivalent to one quart, rehydrated); again use an immersion blender or hand mixer 5) Let the milk/chocolate mixture cool (you can speed this up by setting the bowl it's in, in a container filled with ice) 6) In a medium frying pan, put half a bag (about 5 ounces, I think) of frozen tart cherries; squeeze agave nectar over them (can also use honey, or even sugar) 7) Heat the cherries and sweetener on high heat; you'll essentially be making a chunky syrup; stir with a heat-proof spatula (and smash the cherries, while you're at it, removing pits if you find any) 8) When your syrup thickens, distribute it among the seven yogurt jars 9) When your milk/chocolate mixture has cooled to approximately 110-115 degrees, stir in a packet of yogurt starter (I like to use the Yogourmet yogurt starter); again, use the immersion blender or hand mixer 10) Distribute the milk/chocolate mixture into the jars on top of the cherry syrup 11) Put the jars into the yogurt maker and turn it on 12) Shake one or two jars periodically (wait at least 5-6 hours before doing this) to see if the yogurt has set 13) Once the yogurt has set, put the lids on the jars and put them in the refrigerator for a few hours The instruction manual says it can take 10-12 hours to make yogurt with skim milk. I'd say this was fairly accurate. So leaving this running overnight is one option. I usually just run it on Sundays, when I'm home all day. All sorts of things can alter the incubation time, from add-ins to starting milk temperature, so I find that it is better to just check on the yogurt periodically than to assume an exact number of hours will get the job done. Also, don't keep homemade yogurt longer than about a week, for food safety reasons. Please note: This could, indeed, be used for making non-dairy yogurt. You would want a non-dairy yogurt starter (there's one from Belle + Bella) and you'd probably need to seek advice elsewhere on the web regarding incubation time, thickeners, etc. I have only used this to make dairy yogurt. Anyway, the YM-80 seems to have all the features I need. I'm happy with the purchase and looking forward to several years (at least) of heavy use.
W**3
Worth Every Penny
Not complicated at all, makes yogurt without any additives you can't pronounce, the small glass jars (with lids) that come with the machine are quality and just the right amount for individual servings. Can add honey or even fruit (blueberries). Would make a great gift for a health-conscious person, great for kid's snacks. I would buy this yogurt maker as a gift for family & friends.
C**O
works as should overall
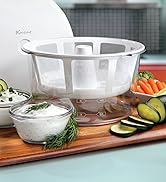
Well thankfully i got a working mostly right unit (so far) and temperature never went past 114 degrees after 8hrs (decided to quit testing after 8hrs since temp stayed the same for last four hours).. Temps were however off in different areas of unit the first 3 hours, after that they evened out to 113-114 in all areas. I used three 1 cup pyrex glass containers filled with water at 107 degrees to test unit every hour. these were my results: after one hour; front left side 109 - back center area 110 - front right side 109 after two; left 111 - back 111 - right 109 after three; left 113 - back 114 - right 111 after four; left 113 - back 114 - right 113 hours five thru eight stayed at same temp as hour 4 (with exception of left side going up to 114 once) for me this unit is acceptable since i am using pasteurized milk and its still below 115 degrees but, if it gets hotter than 115 any time soon, its getting returned since i need a reliable unit that won't kill off the extra probiotic strains i add to my yogurt starter. Overall i like the unit, my first probiotic yogurt batch in it using jars (before testing unit because i was impatient and wanted to make yogurt right away) came out okay overall. i left it on for 8hrs, mixture came out looking thick with whey areas and solidified well overnight in fridge but, quickly liquified into a extra thin creamy mixture the next day after i stirred 2 drops of ezsweetz into one of the jars. it had a slight chalky taste (user error when adding probiotics powder, not unit error i believe), yet it tasted decent but, it tasted more like creamy milk than 'yogurt' to me. different taste and texture for sure than store bought and until i perfect a thicker creamier more yogurt tasting result, thinking i personally will continue buying my fage 2% plain yogurt for enjoyment and use this yogurt maker to make my needed daily extra probiotic filled yogurt while i learn to perfect a thicker yogurt without having to use dry milk or thickening agents. If you like fage/thick yogurt, thinking buying the strainer that goes with these euro cuisine makers is a good idea afterall. Oh and the unit did get a bit of condensation on cover, i ended up going ahead and cutting corners off a papertowel and lightly placing it over jars so no water would get into them, worked well and caught the drops that dripped when i was taking lid off. UPDATE: going ahead abnd buying the "Euro Cuisine GY50 Greek Yogurt Maker" aka strainer and straining chilled yogurt for almost 2 hrs (till 1 cup whey worth, which was 1/4 of my batch) made the best medium plus thick and creamy tasting yogurt ever! just as good as fage total, if not better! I did not use the jars this time to make yogurt, only to store finish yogurt in. Instead I used an Anchor Hocking 7-Cup Glass Round dish/bowl which fit perfectly in the unit and more evenly fermented the yogurt IMO..no grainy chalkiness whatsoever with this batch! highly recommend getting the strainer.
P**O
It’s worth, buy it.
The maker works well, buy it if you want to make yoghurt. Just buy UHT milk like Fairlife and a container of Noosa yogurt as a starter. Heat 1 liter of Fairlife to 110°F (43°C), stir in 100–120g of sugar, then mix in the Noosa yogurt. Incubate for 6 to 8 hours, and you’ll get thick, delicious homemade yogurt. It turns out way better than using Greek yogurt, which separates too easily. Qui yogurt is also good.
A**T
This is the most simple and wonderful yogurt maker I have ever owned
This is the most simple and wonderful yogurt maker I have ever owned. I got the top tier extender and use one cup canning / jelly jars in the bottom and the jars that came with the machine in the top. I wrap a bath mat over the machine so there is uniform heat in top and bottom and don't have to switch tiers as some recommend. If you are considering buying this product I encourage you to do so without any hesitation. AND there is no need for the timer (or even the "hour marker" that comes on the machine). Buy the "cheaper" "stripped" model without the timer. One other thing I found handy is I put a wet washcloth on the bottom before I put the jelly jars in and it seems to disperse the heat more evenly. I lay it across the round of the bottom and the four corners stick out a bit. PLEASE NOTE: the extender will NOT sit exactly sealed when you use the jelly jars on the bottom as they are a bit too tall. But using the bath mat makes a wonderful "blanket" and the slight gap makes NO difference in the yogurt. A further note - I wanted to make greek yogurt and read about all the "straining" and other effort necessary and was so discouraged. But I simply use greek yogurt culture for my starter and it makes VERY THICK yogurt without the fuss. My EASY recipe is - I do NOT heat the milk etc. I take room temp milk (from our cow), put 1/2 cup yogurt from the store or yogurt from one of the 6 oz jars that comes with the machine - in the bottom of a glass pyrex one quart pouring measuring pitcher, whisk in a little milk to disperse the yogurt, then add three cups of milk and whisk again. I then pour it into jars and place them into the machine and repeat until I've filled as many jars as I want to. I would give this gift to ANYONE who has a cow (or goat). I cannot say how it works with store bought milk as I have never used it. I do know friends who add a little dry milk powder to their milk to make it thicker - but the greek culture works great instead for me. Many people also make milk from almonds and coconuts and have success with yogurt that way - so maybe the storebought almond milk and coconut milk in the milk cartons would be great for yogurt too as an alternative to dairy. I hope this review encourages people to try this product and EAT LOTS OF YOGURT with full control of what goes into their bodies. This is a LOVELY, SIMPLE and well made machine. And the price is absolutely WONDERFUL. Another bonus - it has a TINY footprint and all the parts nest (upside down etc) very nicely so it fits easily in my cabinet and doesn't take up much space on my counter when in use. While it is bigger than my toaster, it fits where a toaster fits on a small counter. Another tip - I put the cardboard case that the jelly jars came in in my cabinet and as they are emptied they get put in there until refilled. I make sure that I eat the yogurt jars that came with the machine last as they are 6 oz vs the 8 oz jelly jars and save enough to make the number of jars I want. I only buy culture about once every three months - a quart of plain greek. I buy new when the culture gets a bit runny. I absolutely LOVE this little machine.
L**S
I love the Euro-Cuisine YM80 yogurt maker - I use it every week
I bought the Euro Cuisine YM80 yogurt maker about 9 months ago. I wanted to really try it out before leaving a review. Disclaimer – I never made yogurt before owning this yogurt maker so I can not compare it to other yogurt makers or making it in a oven or crock pot. I love this yogurt maker and have been using it once to twice a week since I got it. I find that whether or not homemade yogurt is cheaper than store bought depends on your ingredients that you are using ie: organic milk vs. regular store brand milk. I was eating brand name and store name yogurt daily and it was getting costly. This really cuts down on the cost and tastes a lot better. (Partly tastes better since I am not using skim milk – I use either whole milk or 2% and it is wonderful.) The instructions with the yogurt maker are not necessary perfectly clear for a beginner. The area I found to be a little confusing is how long to incubate the yogurt. Example - Softer yogurt without boiling times: 8 hours for whole milk, 10 hours for 2%, and up to 12 hours for skim milk. Then under instructions it states: set time for yogurt – 8 hours for whole milk, etc. They do not give any time difference for using boiled milk or non-boiled. So that being said, I decided to boil my milk and use the times listed: 8 hours whole, 10 hours 2% and 12 hours for skim. (Haven’t bothered making the skim so I can’t say if that is accurate.) The yogurt maker has a hours reminder on the device. It does not turn off the yogurt maker and I am not sure if it was supposed to move during the incubating process but mine never did anything. I don’t bother with it. I just put a little sticky note in front of the device of my shut off time and set an alarm on my phone. I have been making yogurt with a 6 oz container of plain yogurt from the store. Then I make the next batch with a jar of my plain yogurt. I tried using a probiotic capsule that was a disaster and I ended up throwing out that batch. I have not tried using the freeze dried yogurt starter yet. I just priced it out and bought some that would equal $0.70 a batch and I would be able to reuse my yogurt at least once and maybe twice. I will update my review later after using it. Now after having this for awhile I have noticed I could not find any recipes for Coconut Yogurt which was my favorite. I came up with a recipe that has consistently delivered great results Coconut yogurt • 1 13.5 ounce can of Coconut Milk (I have used Goya) • Whole milk or 2% milk ( 4 cup measuring cup filled with contents of coconut milk – add the milk so that it comes up to the 4 cup point) • 1 scoop (1/3 cup) of dried instant non-fat milk (I have used Carnation milk) • 6 oz container of plain yogurt or yogurt starter • ½ teaspoon of coconut extract • 8 packets of Stevia in the Raw (or sugar) Add coconut milk, regular milk and dried milk to the saucepan and heat till the milk starts boiling and climbing up the pot. I place the pot in the sink with an ice bath to cool down faster. Cool to 95 degrees F (stir a few times to reduce hotspots – use a thermometer to check the temp). Then pour some of the liquid in the 4 cup measuring cup and add your starter. Blend til smooth and add back to the pot. I then add the coconut extract and sweetner. I put in the Eurocuisine containers and place in the yogurt maker. Incubation times depend on milk used – Whole milk is 8 hours and 2% is 9 hours. (The fat content in the coconut milk is similar to whole milk so I used that as a judge when deciding the times.) Please let me know if my review was helpful or if you enjoyed my recipe. Click the button below if this helped you at all. Thanks
W**E
There is a better way than this.
I purchased this unit, and have made 2 batches of yogurt with it. It works, and I have had no problems with it. I recommend that you DO NOT purchase one. Read why... I used to have an old Salton unit that I used every day, and I wanted to start making fresh yogurt, again, so I purchased this one. It was highly recommended. This unit makes almost 1 quart, split into 7 cups. The cups are small. They are not smooth inside, so are difficult to clean - they require a bottle brush and a lot of work to get clean. They are like baby food jars, with an indention around the bottom and an overhanging rim. Hard to explain, and hard to clean. leaves too much waste in the jar. It takes about 12 hours to make a batch. That's a long time. You have 2 good choices for making the yogurt.... 1 way is to use hot water (100degrees F), dry milk powder (1 1/4 the amount to make regular milk), and some plain yogurt from a previous batch (a couple of tablespoons will do.) Stir and or shake. pour into the cups, and put into the turned on machine. I like to have the lids on the jars (loosely), but they don't fit very well. Another review says to put a cloth under the cups and plastic wrap over the jars, then the top on the machine. Then wait 12 hours. Chill, add fruit when it's chilled. The other way is to heat milk to 180 - 200 degrees F, cool (put pan in cold water in the sink and stir works quickly), add plain yogurt to start (a couple of tablespoons is plenty, from a previous batch or fresh from store - both work fine.) Then pour into cups .... blah, blah, blah ... wait 12 hours, cool, presto - more yogurt. Oh, yeah, a meat thermometer works great to know the temperatures.. This is the easier, and in my opinion, THE WAY BETTER WAY -> -> -> Now, it turns out, (Thank you interweb searcher :) - that you can do either of these processes, and make larger quantities, for about the same energy cost. I like the second process - heat the milk (to 180-200F), cool (to 118F), add a bit of yogurt to start, pour into QUART Wide mouth Mason Jars (how many do you want? 2, 3, 4? 10? , put the tops on loosely, put them into the oven that you preheated to 200F then turned off while you were warming the milk. Put a full jar of HOT water into the oven with them (To keep them company? not really, to give more thermal mass so they stay warm). To have the yogurt come out super thick, I stir each jar at about 2 hours, and turn on the oven (at 200 degree setting), to warm it up a bit (for a minute or two only) I replace the HOT water in the water Jar, make sure the oven is really turned off, and wait another 2 hours. After a total of 4 hours (from when you first added the started yogurt), put the mason jars of yogurt into the fridge. When they are chilled, spoon out some of the best yogurt you have ever had. No fuss, no muss, no unhealthy additives, just pure yummy. Enjoy. Oh, sure, there are other ways, and the machines work, but this is my review, and this is MY opinion, and this WORKS GREAT, for me.
V**N
I recommend
So easy to use
M**K
good design
Product arrived in excellent condition. The only thing I didn't realise, was that it won't work on the UK electrics. If it had worked with our electrical system it would have been just what I wanted.
A**.
Doesn't work in Singapore
This product doesn't work in Singapore voltage and it shouldn't even be listed here. Questions & Answers was misleading stating it would work, but it was a total failure when it came as it is designed for 110V. I tried to contact the seller with no success.
C**N
Iogurteira maravilhosa
Excelente. Faz iogurte denso, mais liquido, com recheio, fica perfeito mesmo usando iogurte comum do mercado
M**E
Es fácil su uso, para mí ningún problema que sea manual el interruptor
Fácil de usar, quedó muy rico mi yogurt! Muy buena consistencia! Lo adquirí por la practicidad de los frasquitos individuales, están super bonitos y las tapas ensamblan perfecto! Me gusta que no tengo que manipular el yogurt ya hecho, se queda la porción individual protegida hasta su consumo! Eso es excelente, higiénico!
A**R
NOT SUITABLE FOR AUSTRALIA
I purchased this yoghurt maker only to find it will not work in AUSTRALIA. I contacted the seller who agreed for me to return the item. I printed out the sellers return label and went to the Post Office. At the Post office i was informed that it would cost more to return the item than I paid for it. Contacted the seller asking would they refund the postage charges. NO REPLY FROM SELLER, THEIR YOGHURT MAKER NO CONSIGNED TO GARBAGE BIN. BE AWARE.
Trustpilot
2 months ago
3 weeks ago